Deliver work

Creating an automated message to chase a supplier

In ZigaflowEssentials, Go and Momentum plans

The short answer

Open a purchase order pre-build in Zigaflow, go to Automated Messages, and create a new blank automated message. Set the days after the trigger, such as a status change to "Sent", choose whether it recurs until the supplier responds, and write the email to the supplier contact with a review link.

Steps

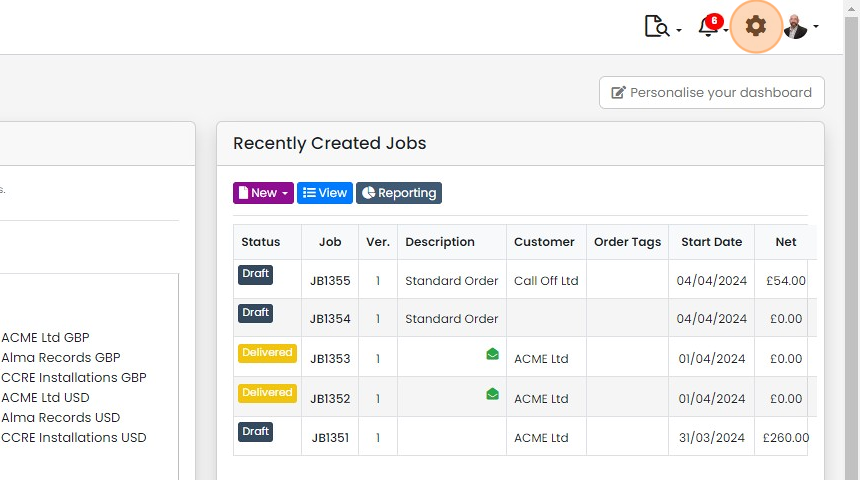
  1. Click here

    Zigaflow dashboard with the settings gear icon highlighted in the top-right toolbar, beside the notifications bell
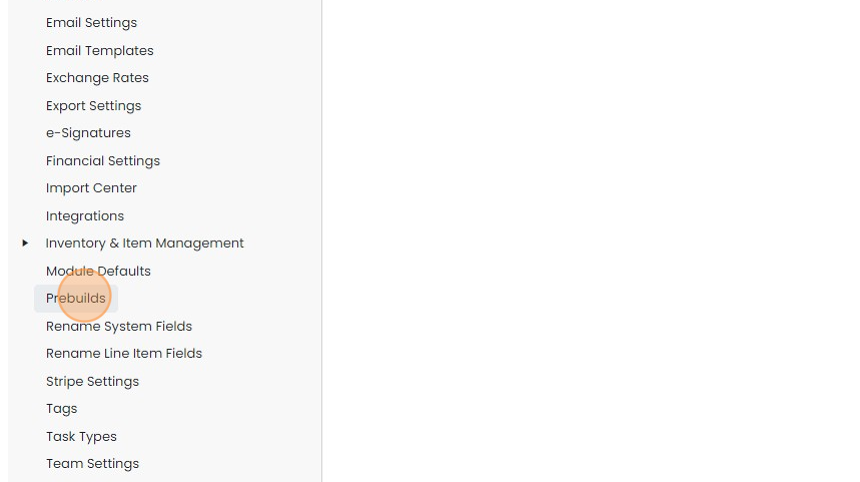
  2. Click "Prebuilds"

    Settings menu list with the Prebuilds option highlighted between Module Defaults and Rename System Fields
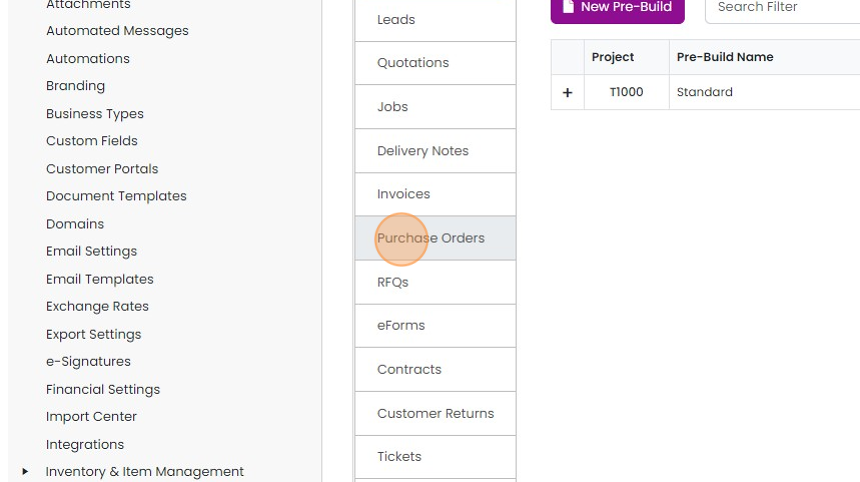
  3. Click "Purchase Orders"

    Pre-Build settings with the Purchase Orders tab highlighted in the document type list, between Invoices and RFQs
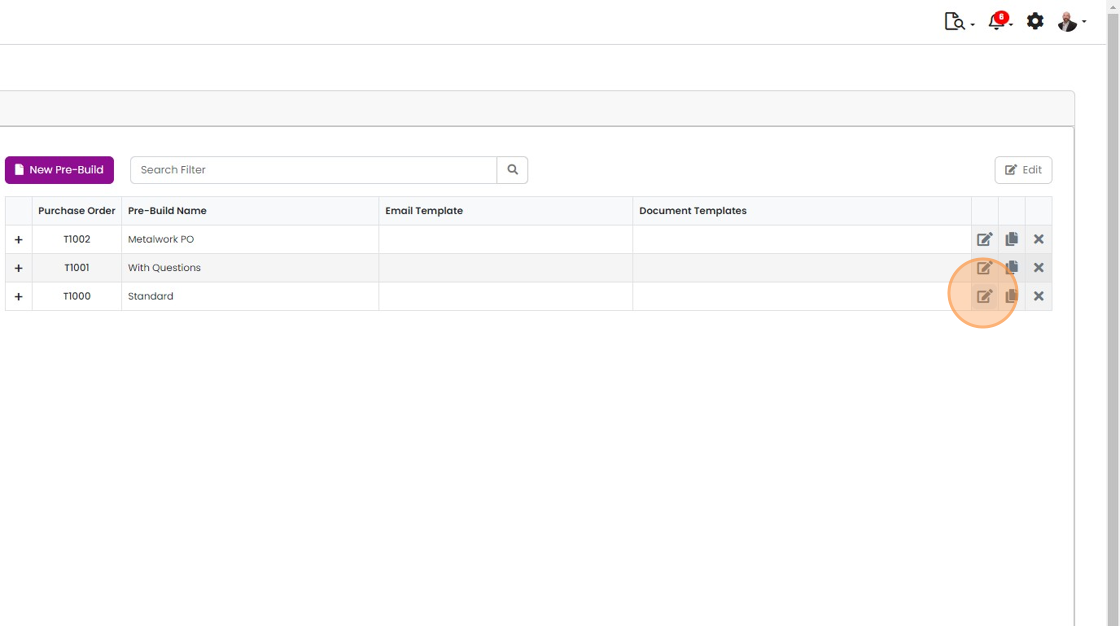
  4. Edit a pre-build

    Purchase order Pre-Build list with the edit icon highlighted on the Standard pre-build row, T1000
  5. Click "Automated Messages"

    Create the automated message
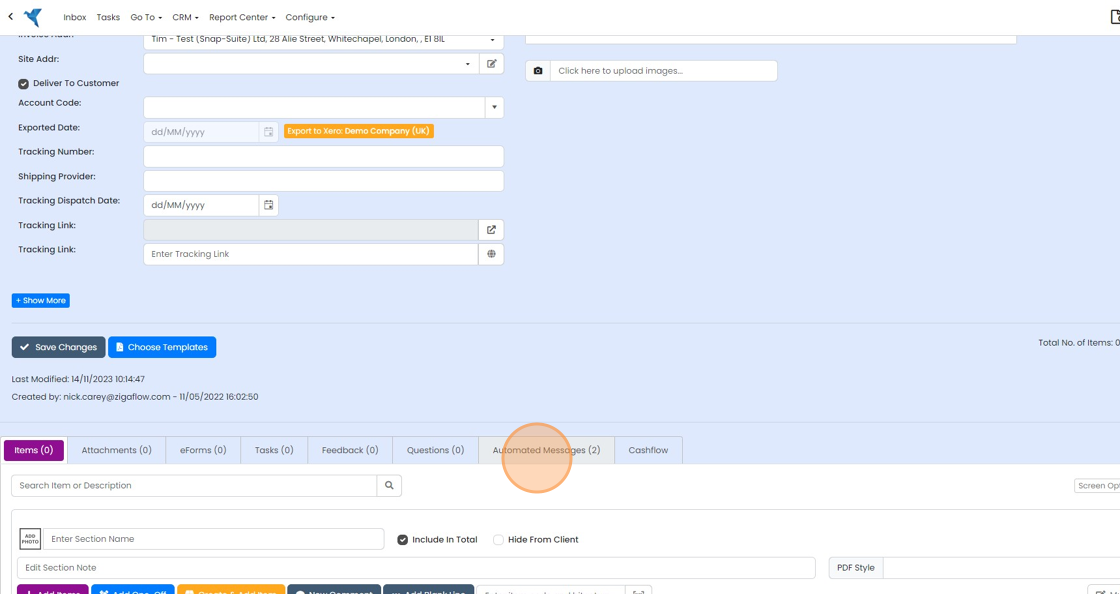
    Record detail page with the Automated Messages (2) tab highlighted in the tab row beside Items, Attachments and Cashflow
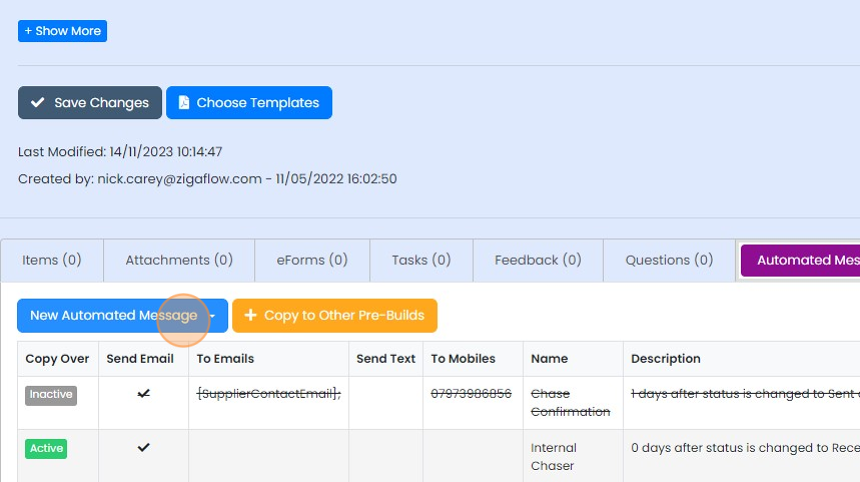
  6. Click "New Automated Message"

    Automated Messages tab of a pre-build with the New Automated Message button highlighted above the list of existing messages
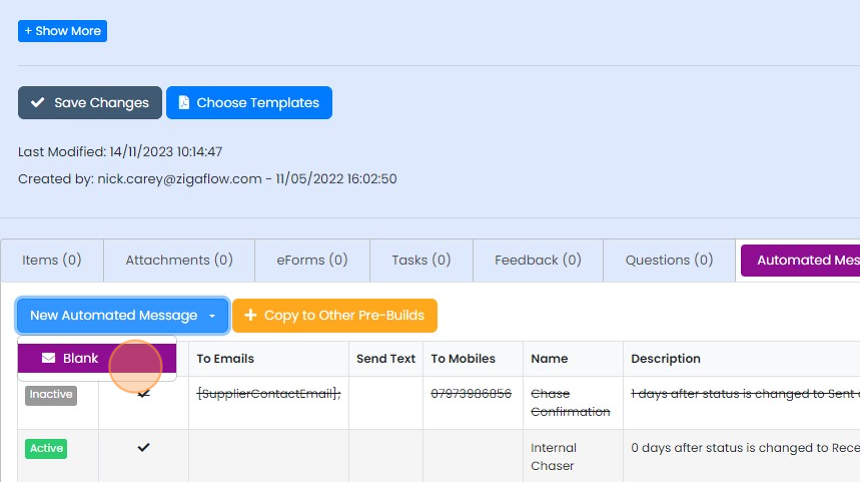
  7. Click "Blank"

    Automated Messages tab with the New Automated Message dropdown open and the Blank option highlighted
  8. Make sure the message is "Active", or set it to inactive while you are building it
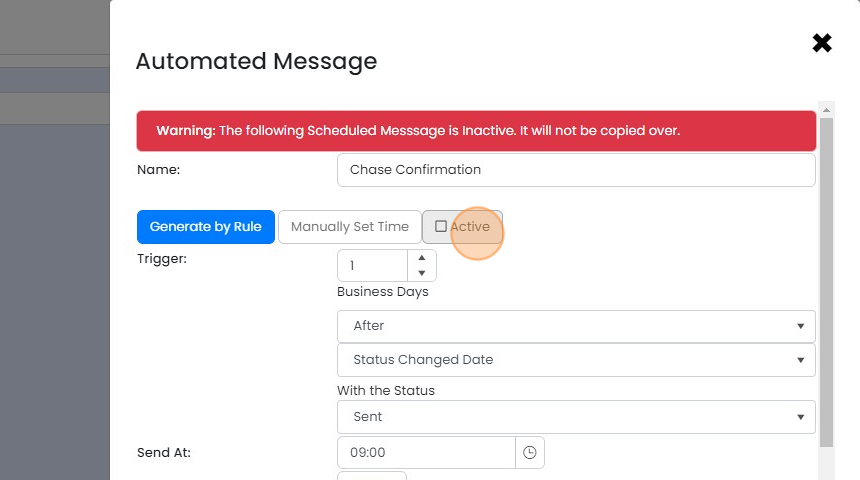
    Automated Message window with the Active checkbox highlighted, unchecked, below an inactive message warning
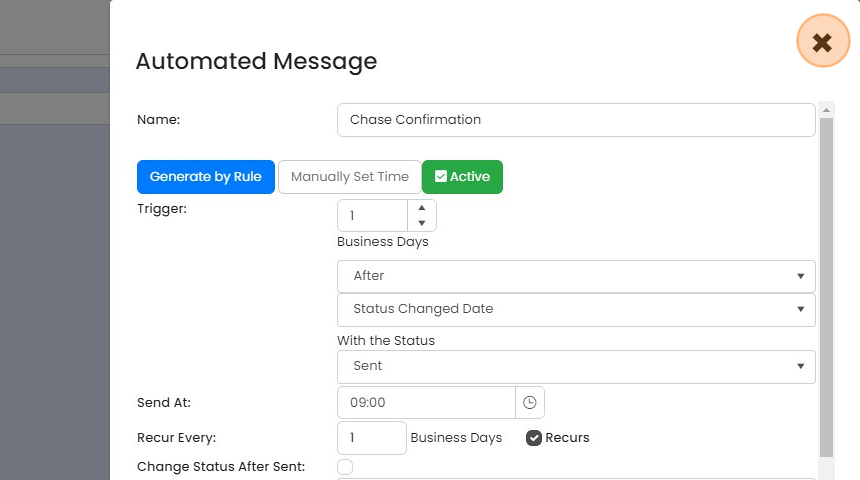
  9. Set the number of days after the trigger event to send the message
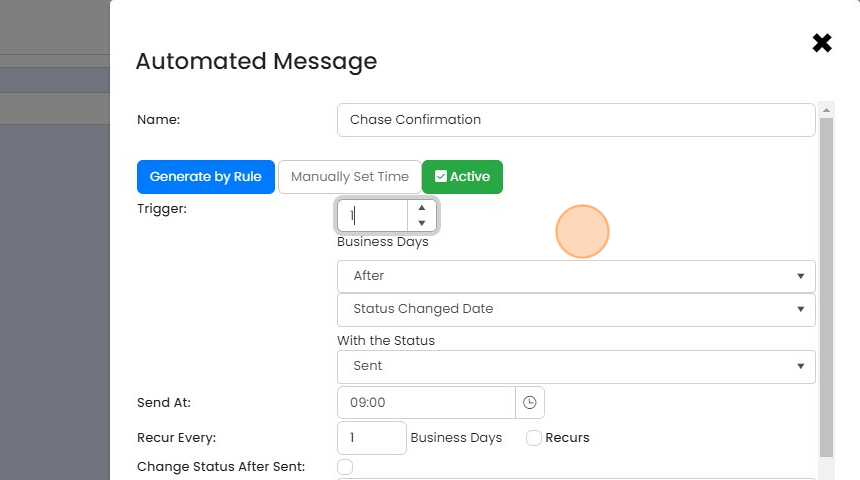
    Automated Message panel with the Trigger field set to 1 Business Days after Status Changed Date with the status Sent
  10. Set the trigger type, for example, "Status Changed Date", or a date

    Trigger settings with the date dropdown open after
  11. Select the status to trigger on, for example "Sent"
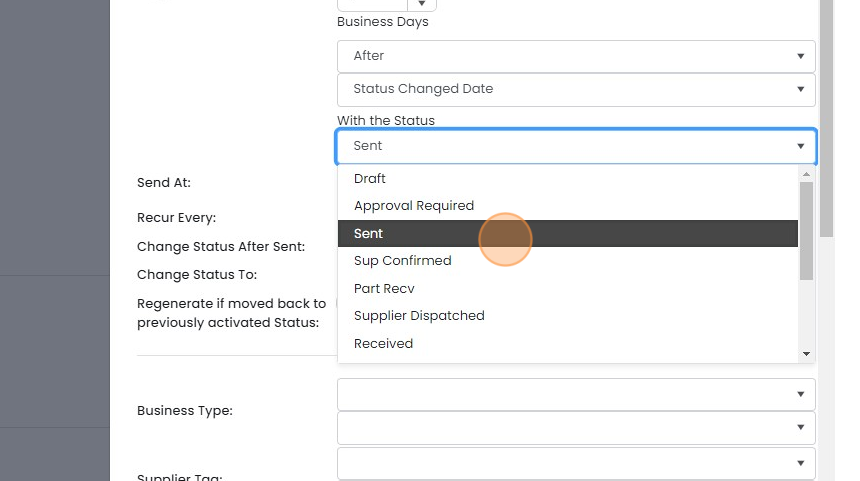
    With the Status dropdown open in automated message settings, Sent selected from purchase order statuses like Draft and Received
  12. If the email needs to be sent repeatedly until the supplier responds, select the days between each re-send
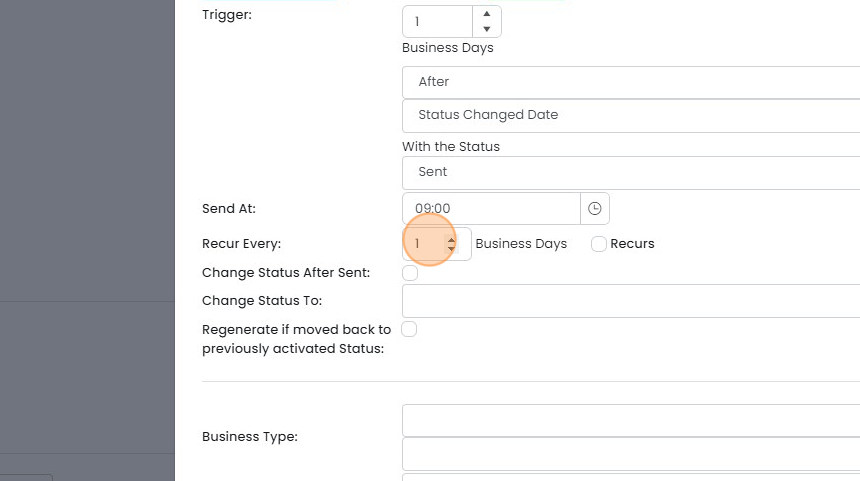
    Automated message settings with the Recur Every Business Days field highlighted, next to the Recurs checkbox
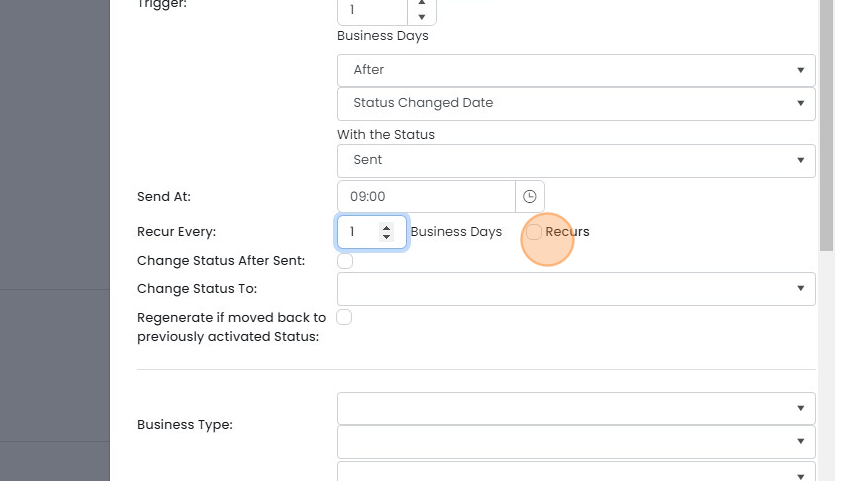
  13. And click "Recurs"

    Automated message settings with Recur Every set to 1 Business Days and the Recurs checkbox highlighted next to it
  14. The message can be sent or not depending on tags and business types. These are checked before it is sent

    Write the email
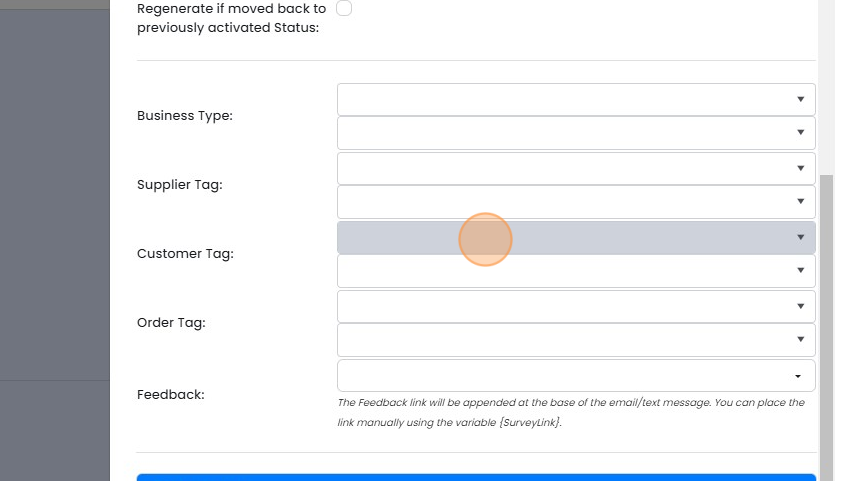
    Automated message settings panel with Business Type, Supplier Tag and Order Tag dropdowns, first Customer Tag dropdown highlighted
  15. Click the "Recipient Email Addresses" field and enter {SupplierContactEmail}

    Click the "Recipient Email Addresses" field and enter {SupplierContactEmail}. This will become the supplier's contact's email address
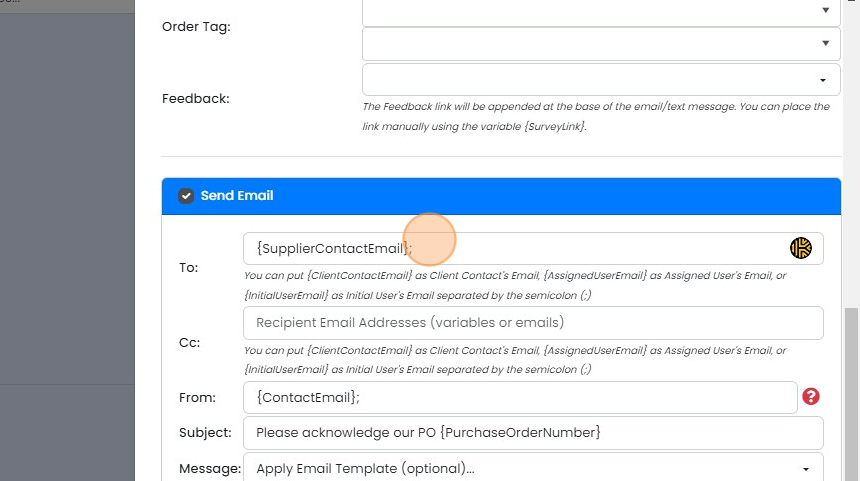
    Send Email section with {SupplierContactEmail}; entered in the To field, below the Order Tag and Feedback settings
  16. Either use a standard email such as purchases@mycompany.com , or {ContactEmail} which will become the...

    Either use a standard email such as purchases@mycompany.com , or {ContactEmail} which will become the Assigned User's email
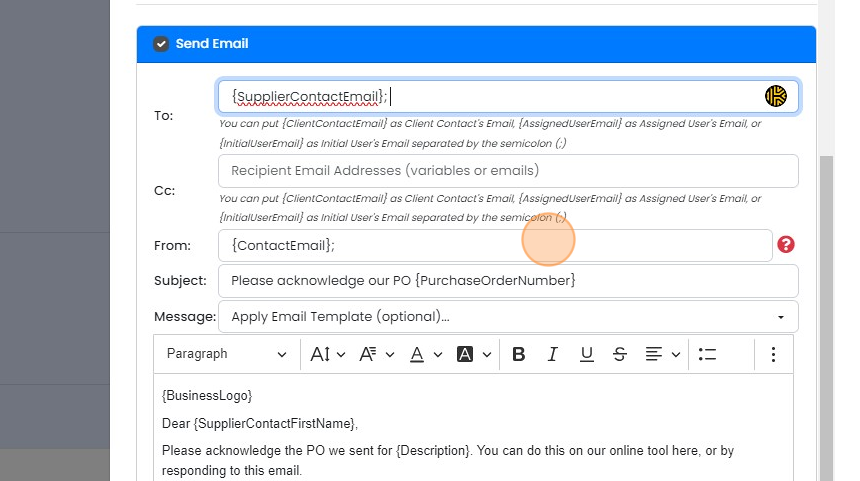
    Send Email action panel with the From field set to {ContactEmail}; highlighted, above Subject and Message fields
  17. Populate the email title with information about the specific PO
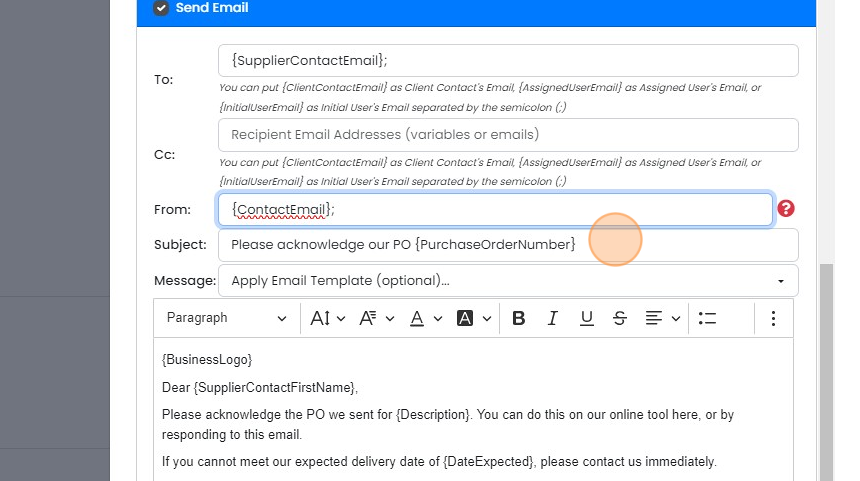
    Send Email panel with the Subject field highlighted, filled with
  18. Enter your text for the email

    Enter your text for the email. Use {ReviewLink} for the URL to the page the supplier can acknowledge the order. This can be placed as a hyperlink under text as well.

    Email editor in the automated message setup, with an orange marker on the message body text where the {ReviewLink} hyperlink goes
  19. Enter {SupplierContactFirstName} to personalize it
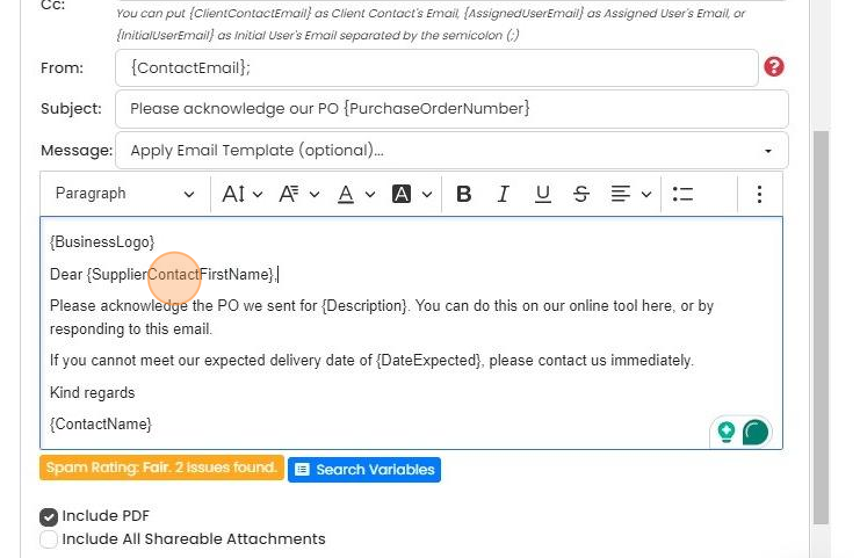
    Email message editor with the {SupplierContactFirstName} variable highlighted in the greeting line of the PO acknowledgement
  20. If you need to find more variables, click "Search Variables"

    Purchase order chase email editor with variables like {DateExpected}, with the Search Variables button below the message highlighted
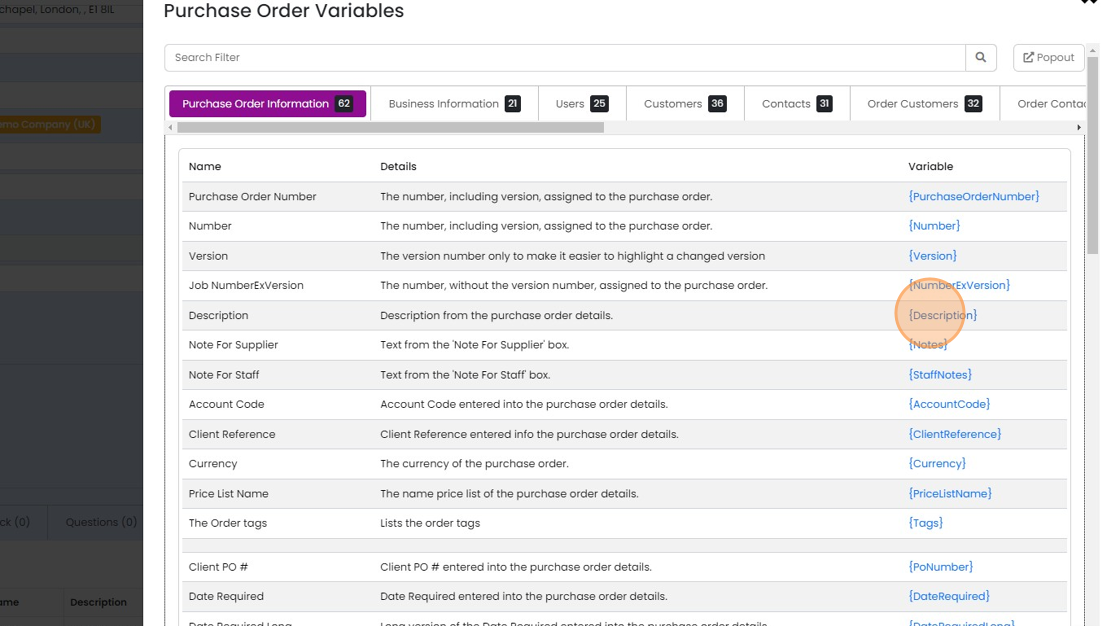
  21. And click on one to copy it

    Purchase Order Variables panel, Purchase Order Information tab, with the {Description} variable highlighted to click and copy
  22. Click "×"

    Check the variables

    Variables panel on the Purchase Order Information tab with a Copied to Clipboard notice and the close × button highlighted
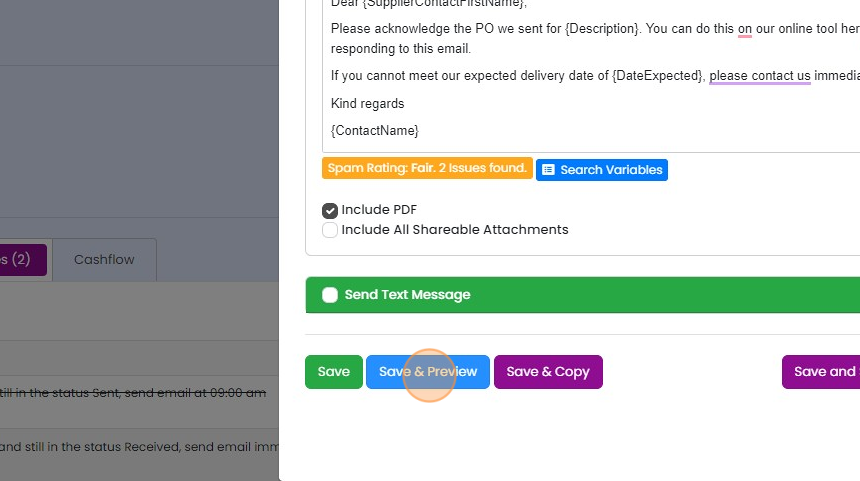
  23. Check all the variables resolve

    Automated supplier chase email editor with Include PDF checked and the Save & Preview button highlighted to check variables
  24. If the variables are not recognized, the {} brackets will be visible
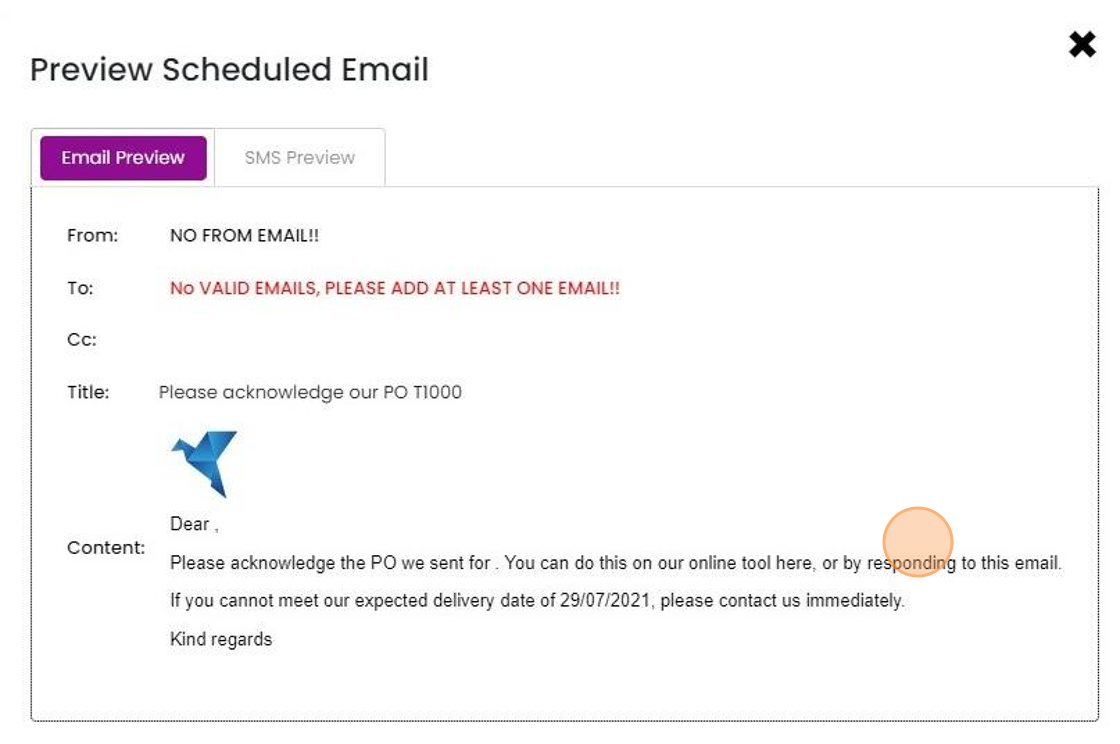
    Preview Scheduled Email on the Email Preview tab showing a PO acknowledgment message with variables filled in, no {} brackets
  25. Click "×"

    Pop-up over the Automated Message form with the × close button highlighted in its top-right corner
  26. Click "×"

    Copy to other pre-builds

    Automated Message panel for Chase Confirmation with the close (×) button highlighted in the top right corner
  27. Copy the messages to the other pre-builds using this button
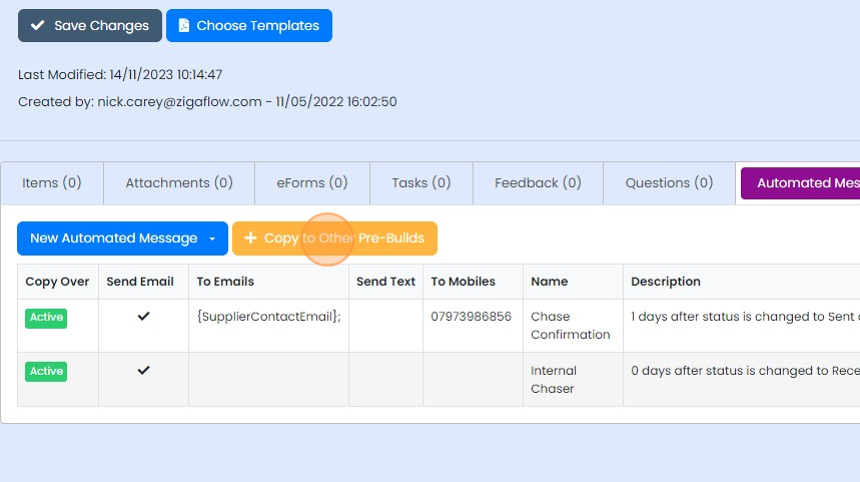
    Automated Messages tab of a pre-build listing two active messages, with the Copy to Other Pre-Builds button highlighted
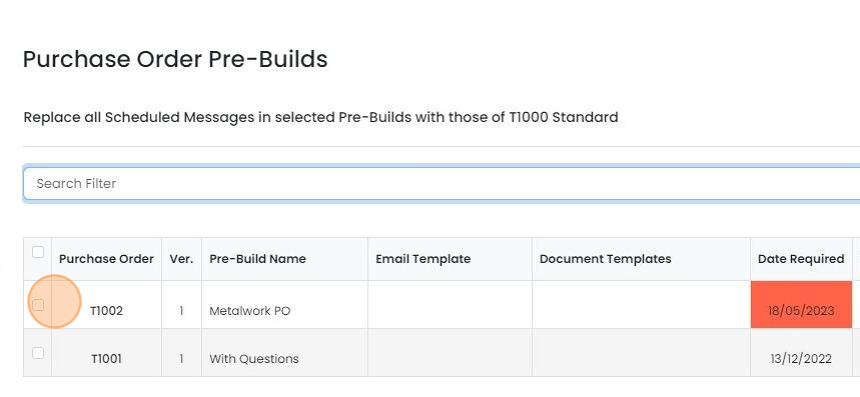
  28. Select the targets

    Purchase Order Pre-Builds list for replacing Scheduled Messages, with the checkbox for pre-build T1002 Metalwork PO highlighted
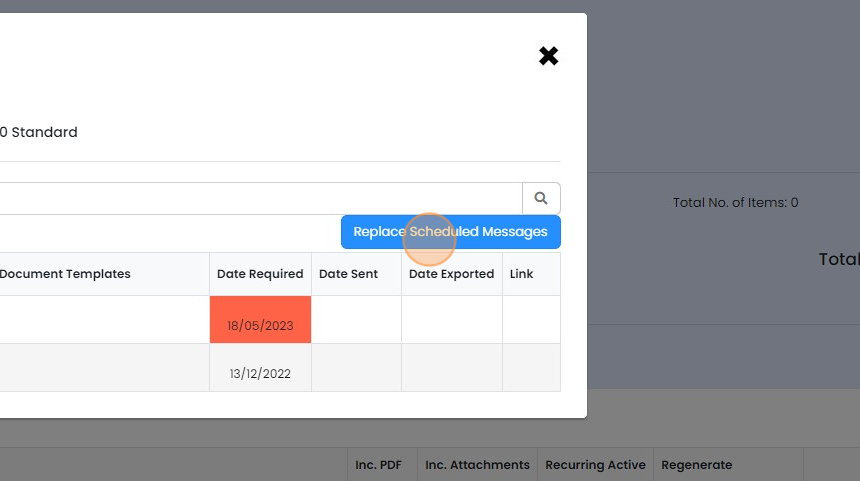
  29. Click "Replace Scheduled Messages"

    Scheduled messages panel with the Replace Scheduled Messages button highlighted above the Date Required and Date Sent columns
  30. Click "×"

    Modal with Replace Scheduled Messages button and message list, close × button highlighted in top-right corner

Zigaflow allows your suppliers to acknowledge online that they have received your order. This will automatically move the PO to the status of "Supplier Confirmed". This article explains how to let Zigaflow chase the supplier if they have not done this.

Whenever a scheduled message is set to run based on a status (such as the PO being sent), and it changes to another status, the message will no longer be sent.

The same style automated message can be set up to chase a supplier in RFQs.

Open the purchase order pre-build

Frequently asked questions

Next step

Creating an automated message escalating a supplier's lack of responseEssentials, Go and Momentum plansOpen a purchase order pre-build, go to Automated Messages, and create a new blank automated message. Set the business days to wait and the trigger status, then address the email to the assigned user and/or a manager. Add a title, text and the {ReviewLink} variable, preview it, and copy it to other pre-builds if needed.

Was this helpful?

See Zigaflow on your own workflow

Book a demo and we will walk through quoting, jobs and purchasing the way your team runs them.

Or see how Zigaflow would fit your business, free