Make it yours

Creating and automating a customer feedback request

In Zigaflow

The short answer

Create a feedback pre-build under Prebuilds, then add it to an automated message on a Job/Sales Order, Quotation, Delivery note, etc. Choose the status that sends the email, such as Delivered, and attach the feedback pre-build. Customers click a link in the email to leave feedback, which links back to the original document.

Steps

  1. Click here

    Dashboard with the settings gear icon highlighted in the top-right toolbar, above the Recently Created Sales Orders panel
  2. Click "Prebuilds"

    Settings menu list with the Prebuilds option highlighted by an orange click marker, between Module Defaults and Rename System Fields
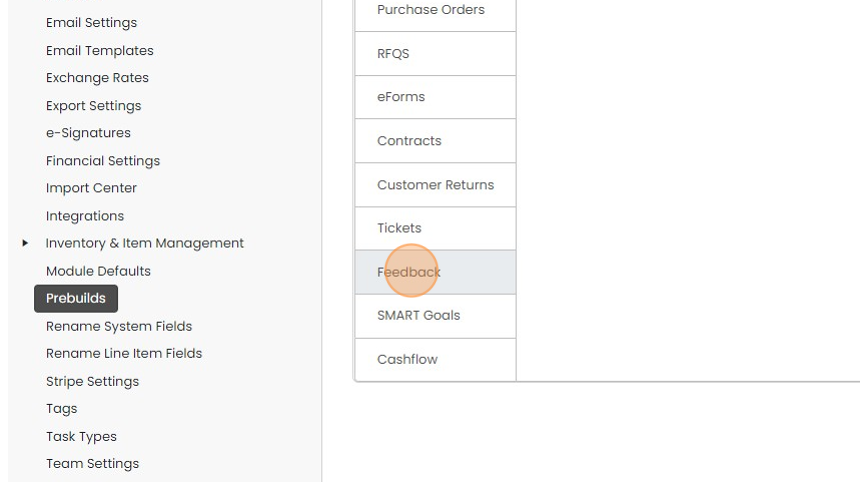
  3. Click "Feedback"

    Prebuilds settings page with the Feedback tab highlighted in the module list between Tickets and SMART Goals
  4. Click "New Pre-Build"

    Pre-Builds screen listing feedback pre-builds, with the purple New Pre-Build button highlighted above the table
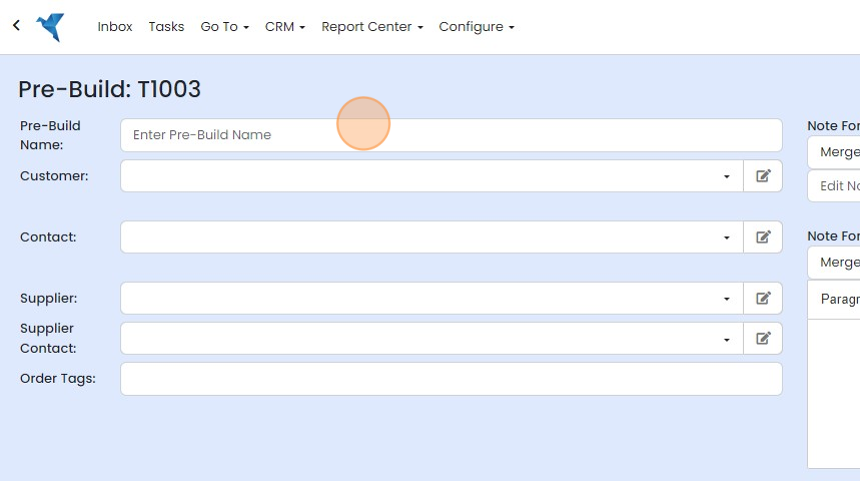
  5. Put in a name for the pre-build

    Pre-Build T1003 form with the Pre-Build Name field highlighted, above empty Customer, Contact and Supplier fields
  6. Enter the question and request for any comments, then click "Save"

    Pre-Build feedback form with Question Title and Comment Title fields highlighted and the Save Changes button circled
  7. Click "Back to Pre-Builds"

    Add it to an automated message
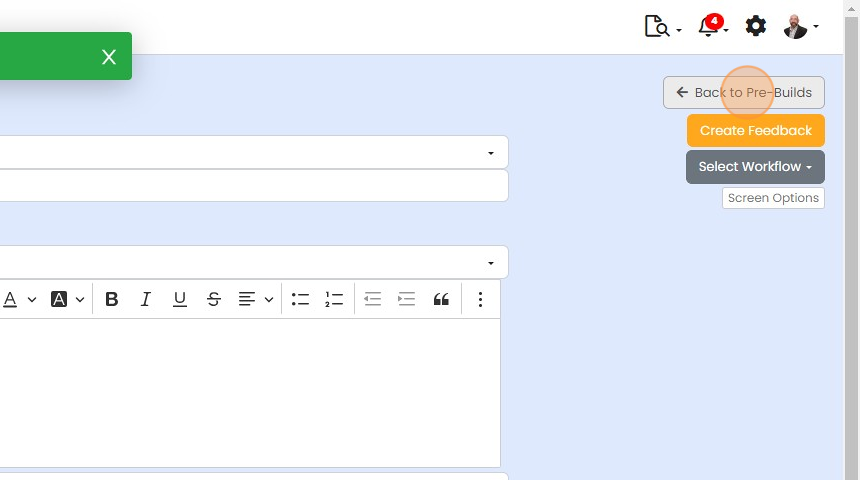
    Pre-build edit screen with green success message and the Back to Pre-Builds button highlighted at the top right
  8. Add it to another pre-build. In this example, Click "Sales Orders" (Jobs)
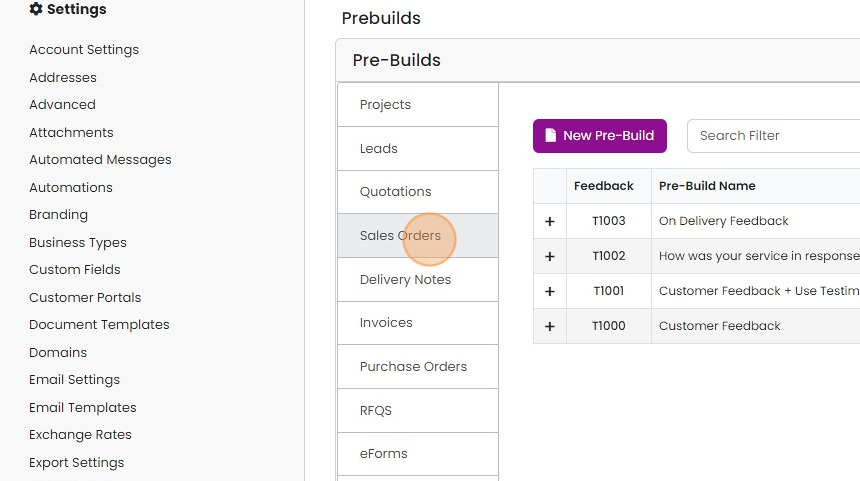
    Pre-Builds settings page with the Sales Orders tab highlighted in the left list, above the Delivery Notes and Invoices tabs
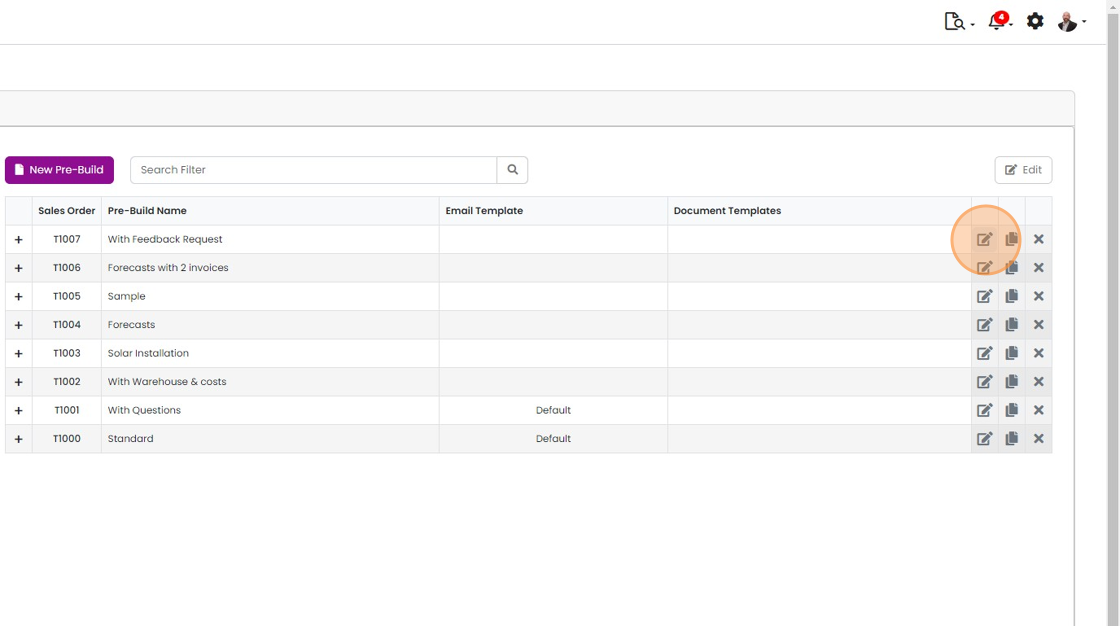
  9. Edit a pre-build

    Pre-Build list with the edit icon highlighted on the With Feedback Request sales order pre-build row
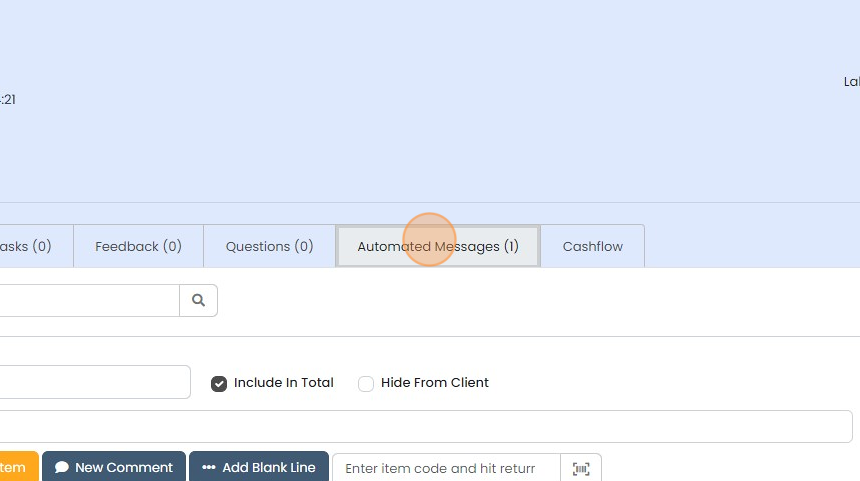
  10. Click "Automated Messages"

    Record tabs row with the Automated Messages (1) tab highlighted, between the Questions (0) and Cashflow tabs
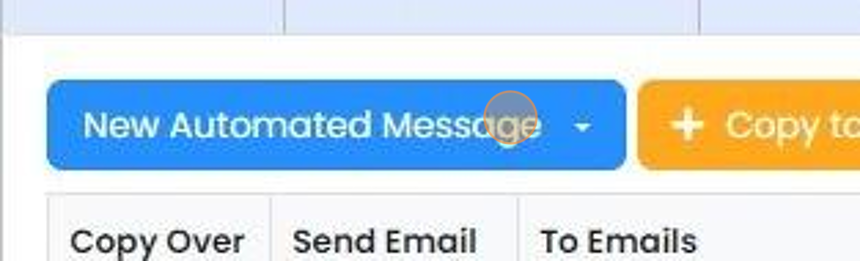
  11. Click "New Automated Message"

    New Automated Message dropdown button highlighted above a table with Copy Over, Send Email and To Emails columns
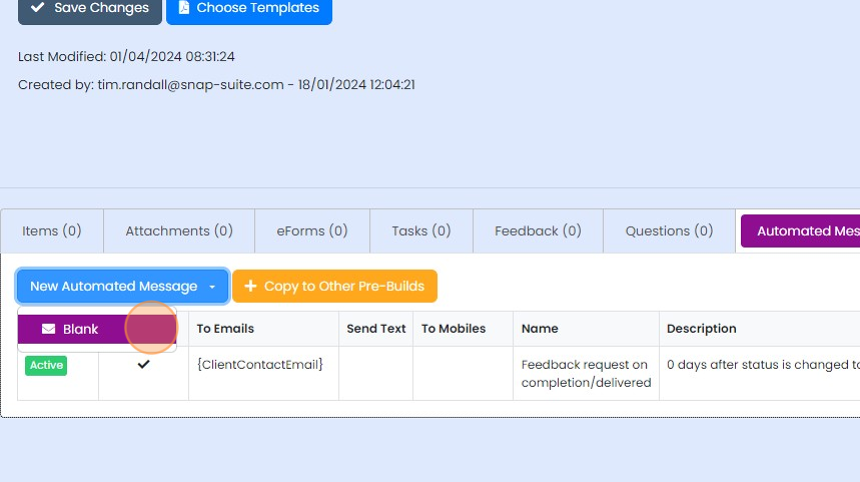
  12. Click "Blank"

    Automated Messages tab with the New Automated Message dropdown open and the Blank option highlighted
  13. Give the automated email a name

    Automated Message window with the Name field highlighted, filled in as
  14. Choose the status at which the email is automatically send, for example, "Delivered"
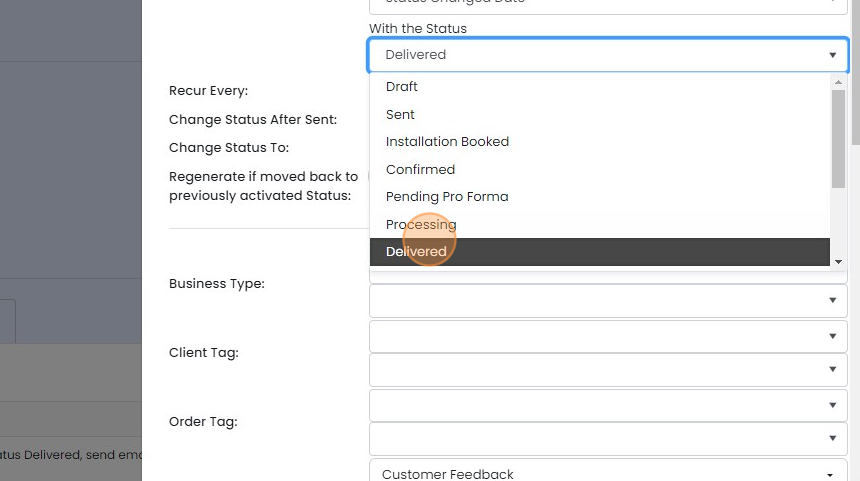
    With the Status dropdown open in the automation settings panel, showing order statuses with Delivered highlighted and selected
  15. Chose the feedback pre-build that will be automatically attached to this email, for example the one just...

    Chose the feedback pre-build that will be automatically attached to this email, for example the one just set up, "On Delivery Feedback"
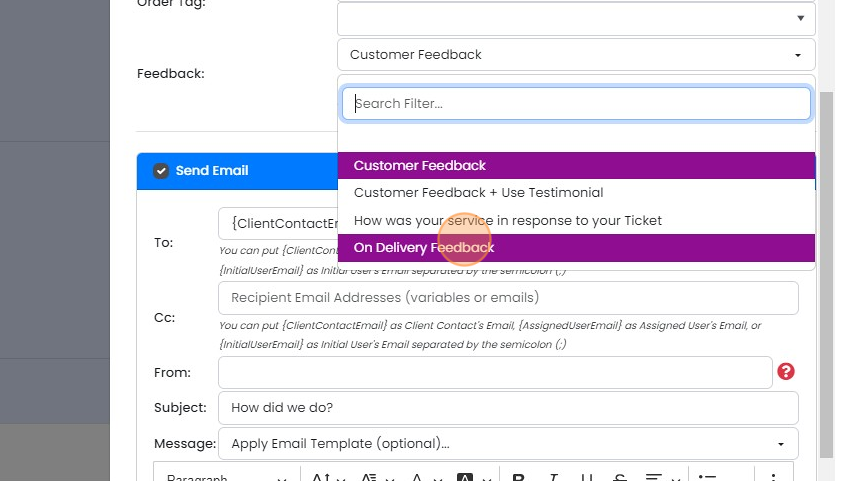
    Feedback dropdown open above the Send Email section, with the On Delivery Feedback option highlighted for selection
  16. Enter the recipient's email address variable in the "To" field
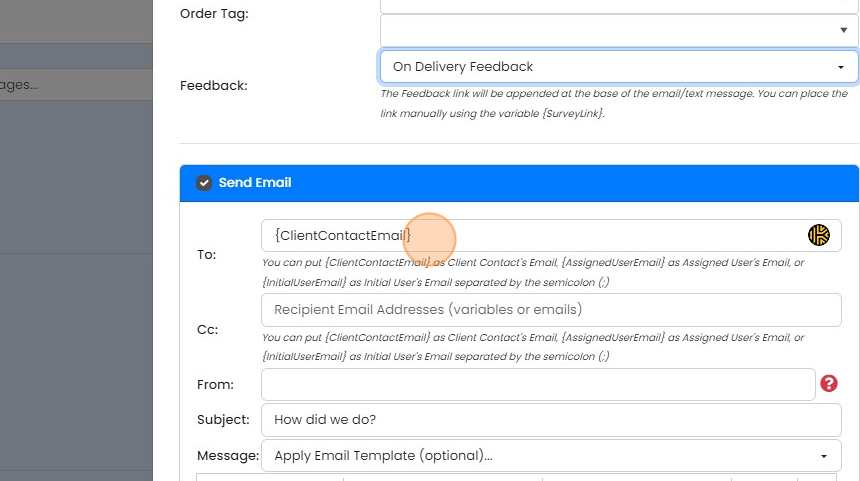
    Send Email panel with the To field highlighted, containing the {ClientContactEmail} variable, below On Delivery Feedback
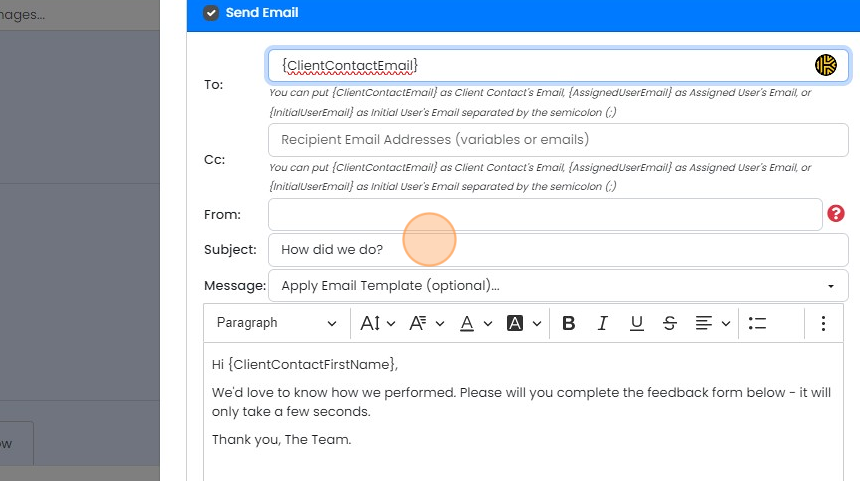
  17. Add a subject

    Send Email panel with the Subject field highlighted, filled in with
  18. Add your desired text to the body of the email
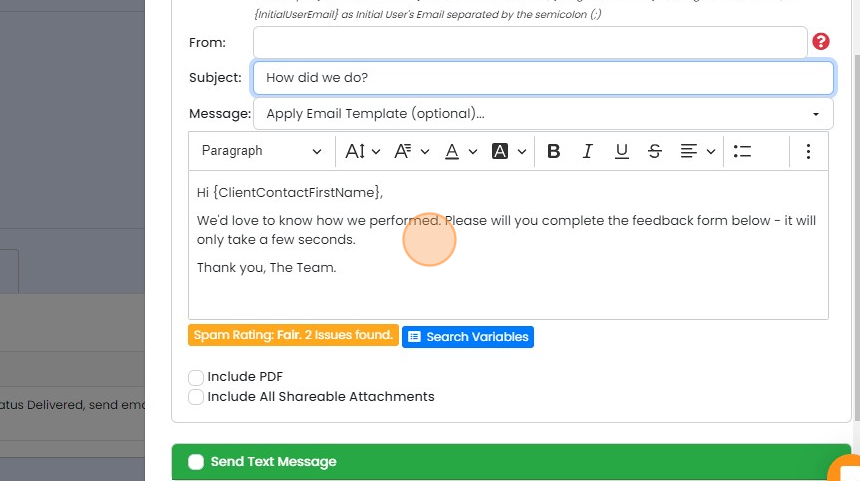
    Email message editor with feedback request text in the body, below the
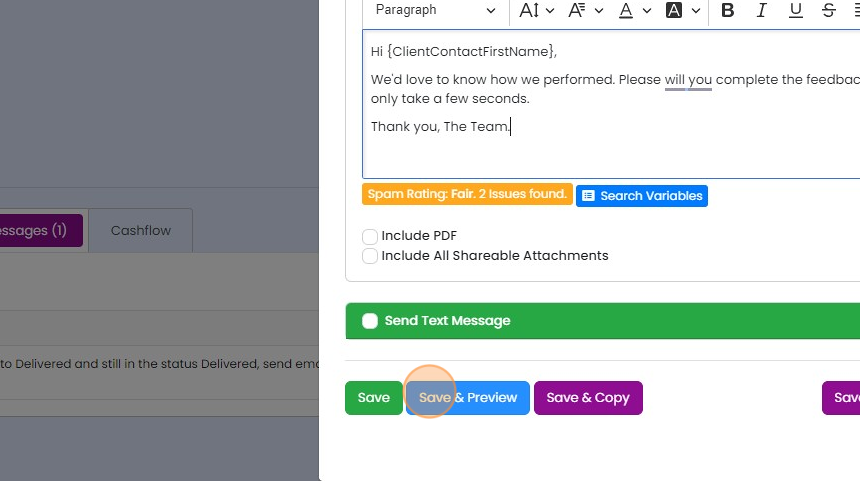
  19. Save and Preview

    Email message editor with a feedback request template, with the Save & Preview button highlighted below Send Text Message
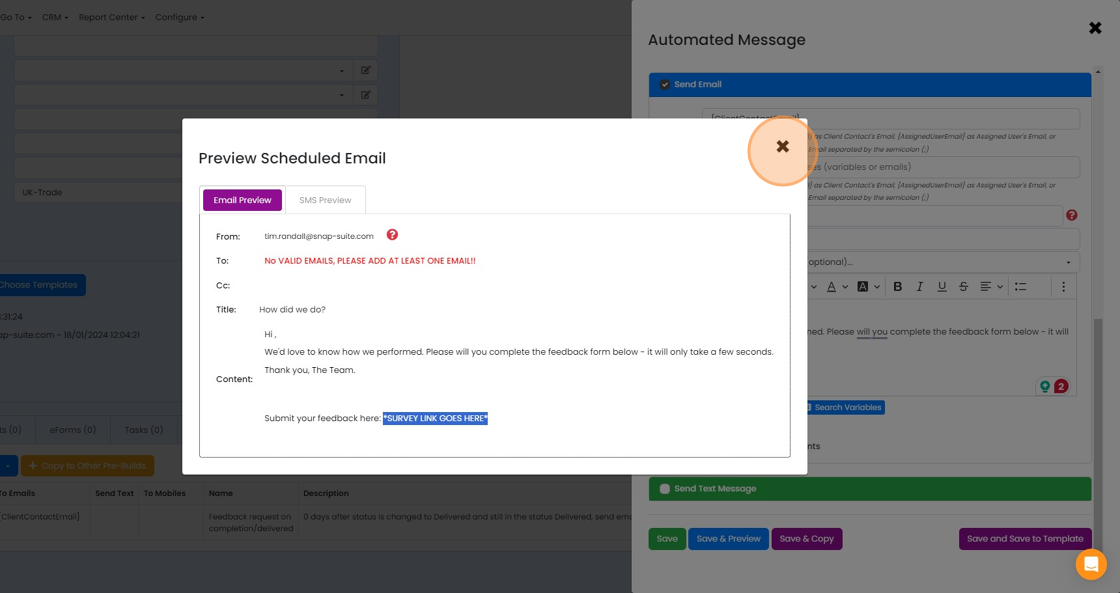
  20. Check the preview

    Email preview of
  21. Click "×"

    Preview Scheduled Email popup with Email Preview tab open, highlighting the × close button in the top-right corner
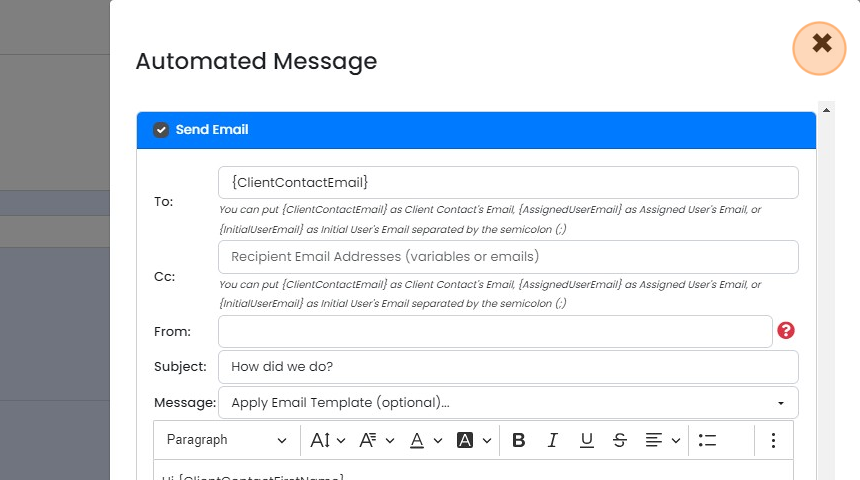
  22. Click "×"

    Test the feedback request

    Automated Message window with Send Email fields filled in and the close × button highlighted in the top-right corner
  23. To test it, click "Go To"

    Pre-Build T1007 screen with the Go To menu highlighted in the top navigation bar, between Tasks and CRM
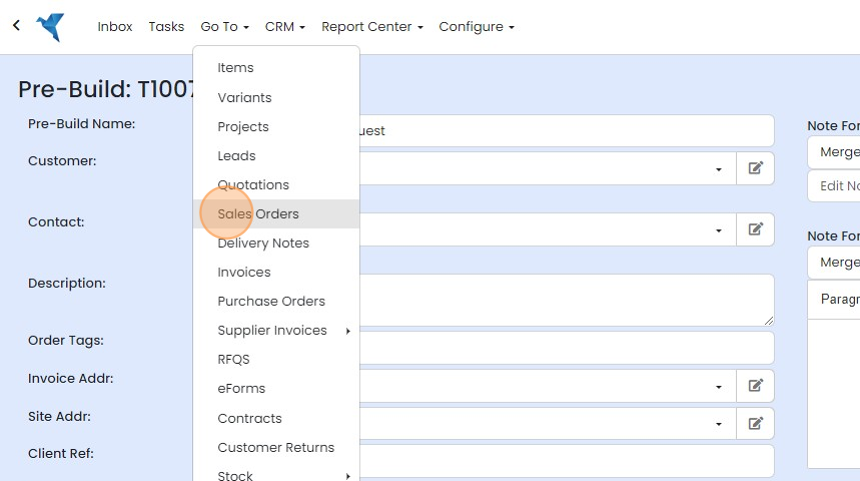
  24. Click "Sales Orders" (Jobs)

    Go To menu open over a Pre-Build screen, with Sales Orders highlighted in the dropdown list
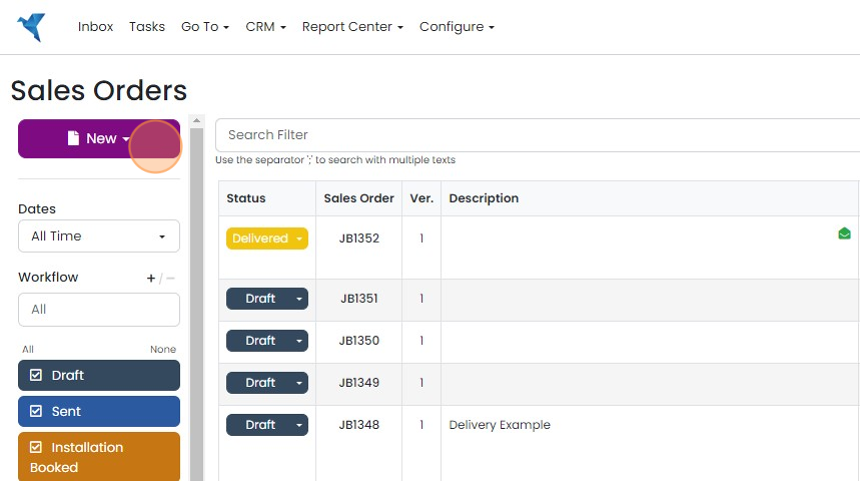
  25. Click "New"

    Sales Orders list with the purple New button highlighted at the top of the left panel, above Dates and Workflow filters
  26. Select the Job/Sales Order pre-build the automated messaged was added to
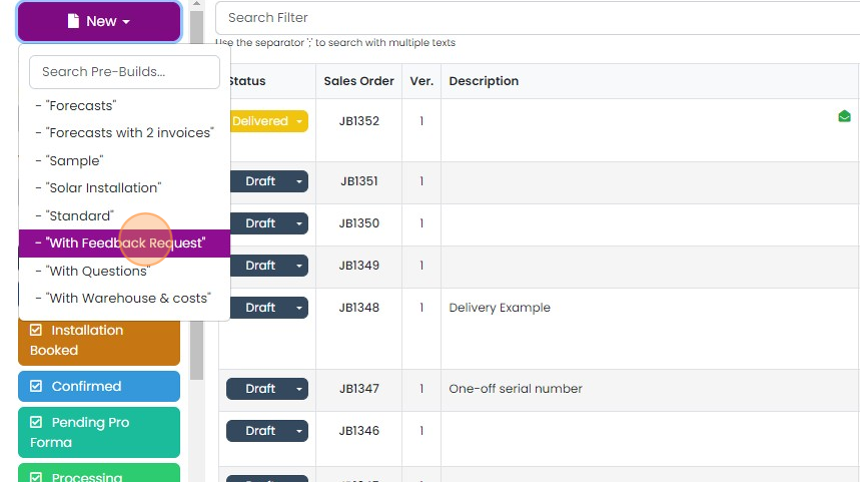
    Jobs list with the New menu open, highlighting the
  27. Enter a customer

    Sales Order screen with the Customer dropdown open, Search Filter box shown and the first customer in the list highlighted
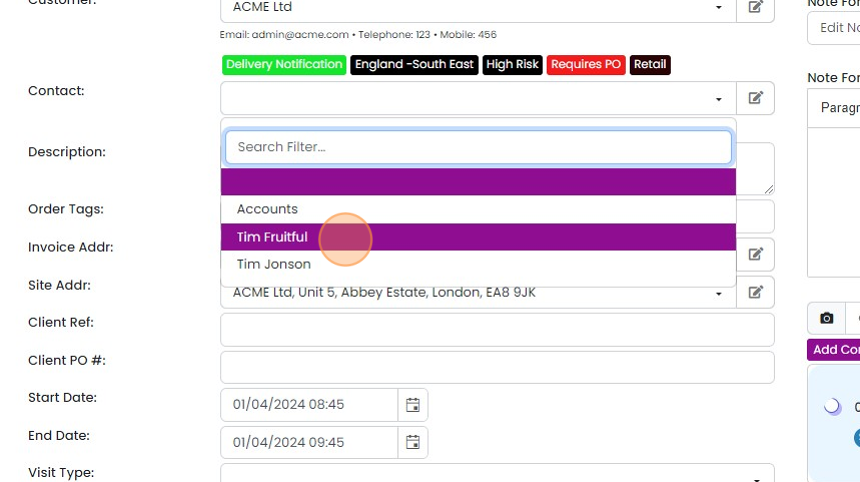
  28. Select a contact at the customer

    Contact dropdown open on the job form, with a Search Filter box and a contact name highlighted from the customer's list
  29. Change its status to the one that triggers the request
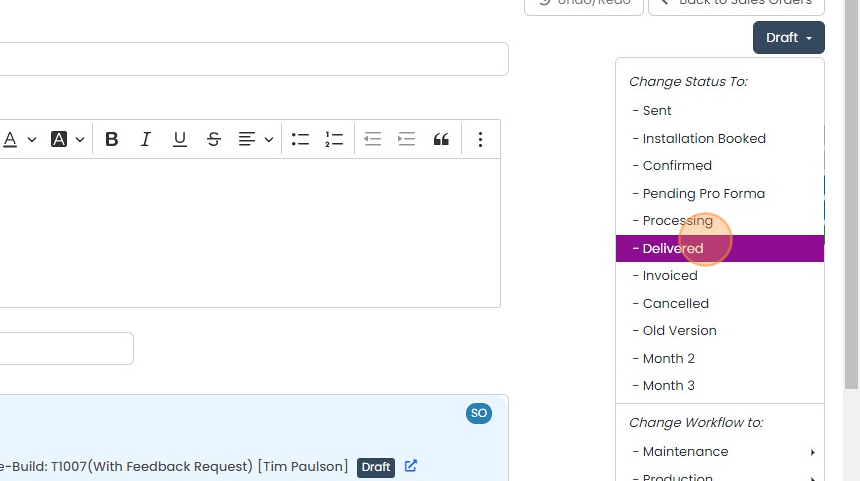
    Sales order Draft status menu open with Change Status To list, Delivered option highlighted to trigger the feedback request
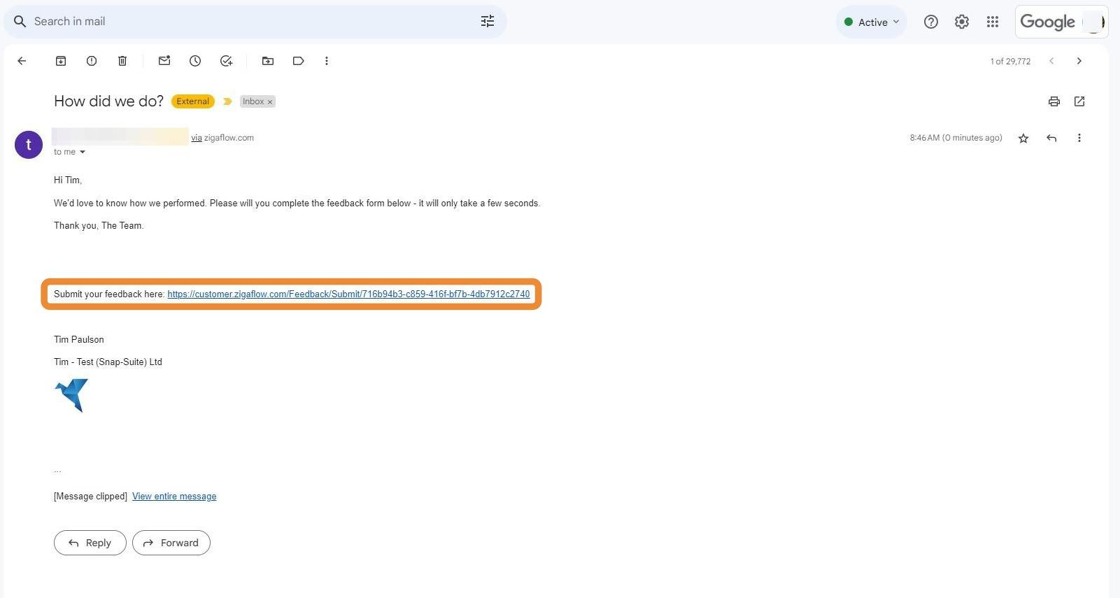
  30. The email will similar to this;

    Gmail inbox showing a received
  31. The customer can click on the link

    Feedback request email
  32. The customer sees this screen where they can leave their feedback

    View the feedback response
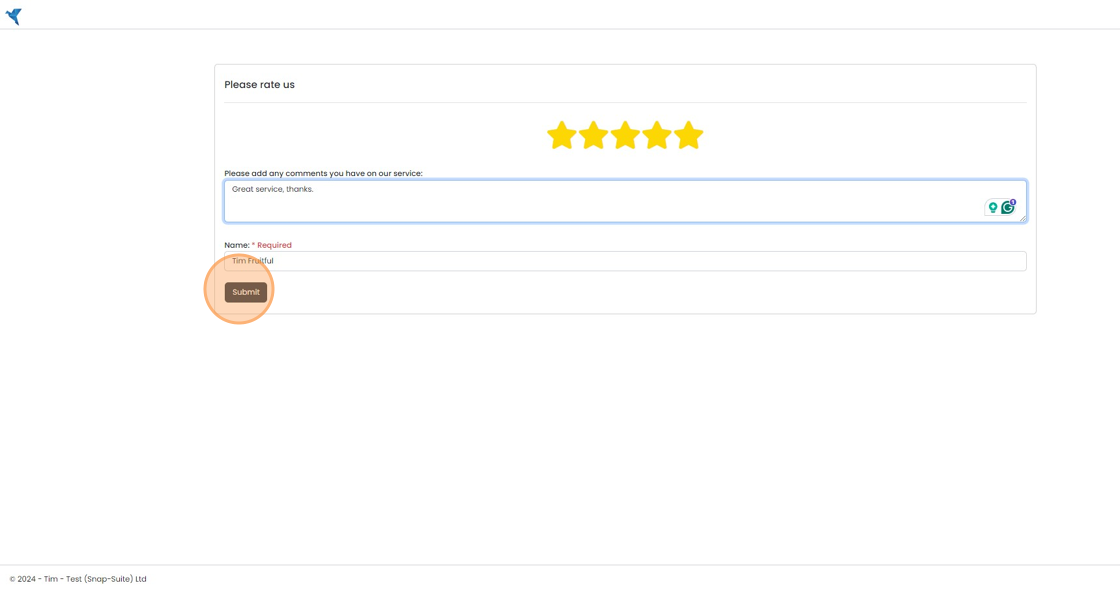
    Please rate us feedback form with five stars, a comments box and a required Name field, with the Submit button highlighted
  33. Back in Zigaflow, the feedback response is linked to the original document (in this case the Job/Sales Order)

    Sales Order screen with the
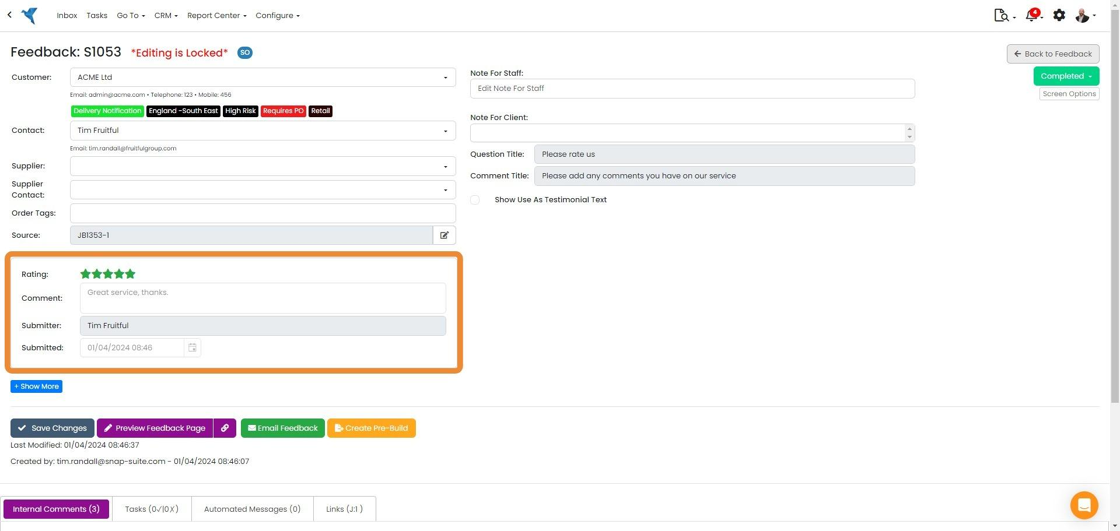
  34. You can see their feedback here

    Feedback record S1053 with the highlighted section showing the customer's star Rating, Comment, Submitter and Submitted date

There are two main steps to this:

Create the feedback request pre-build

Add this to an automated message on a Job/Sales Order, Quotation, Delivery note, etc.

Create the feedback pre-build

Frequently asked questions

Was this helpful?

See Zigaflow on your own workflow

Book a demo and we will walk through quoting, jobs and purchasing the way your team runs them.

Or see how Zigaflow would fit your business, free