Get set up

Set up tags

In Zigaflow

The short answer

Set up tags in Zigaflow settings. Tags come in several types: order, item, task, customer and company, customer contact, supplier, supplier contact, and user tags. Use them to filter and report, and to control automations. Each type applies in slightly different ways, so you add and remove them in different places.

Steps

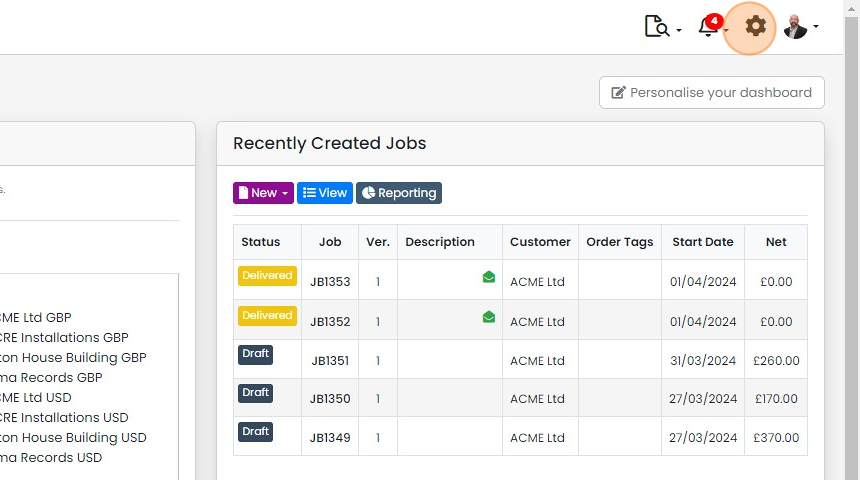
  1. Click here

    Zigaflow dashboard with the settings gear icon highlighted in the top-right toolbar, next to the notifications bell
  2. Click "Tags" to view the tag types

    Add order and item tags

    Settings menu list with the Tags option highlighted between Stripe Settings and Task Types, opening the tag types
  3. Order tags - these are used on Quotations, Jobs/Sales Orders, POs, etc
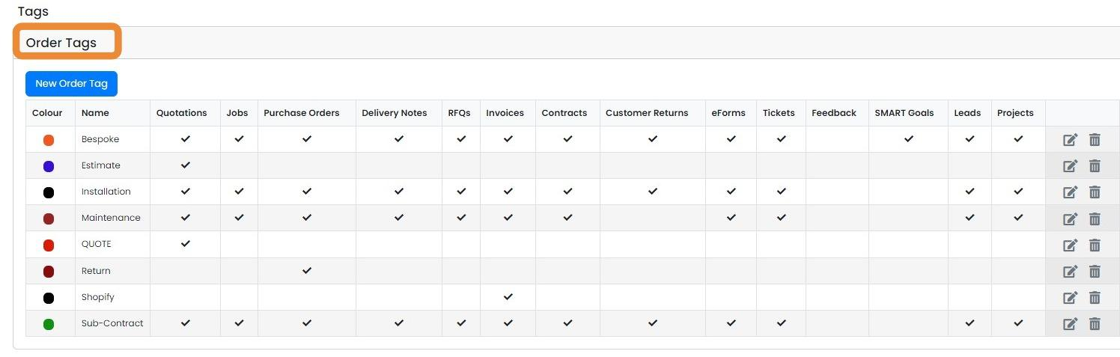
    Tags page with the Order Tags section highlighted, showing the New Order Tag button and a table of tags by document type
  4. On a quotation, etc., click on this field to add or remove a tag (if it is not visible, click on the...

    On a quotation, etc., click on this field to add or remove a tag (if it is not visible, click on the "Screen Options" button to display it)
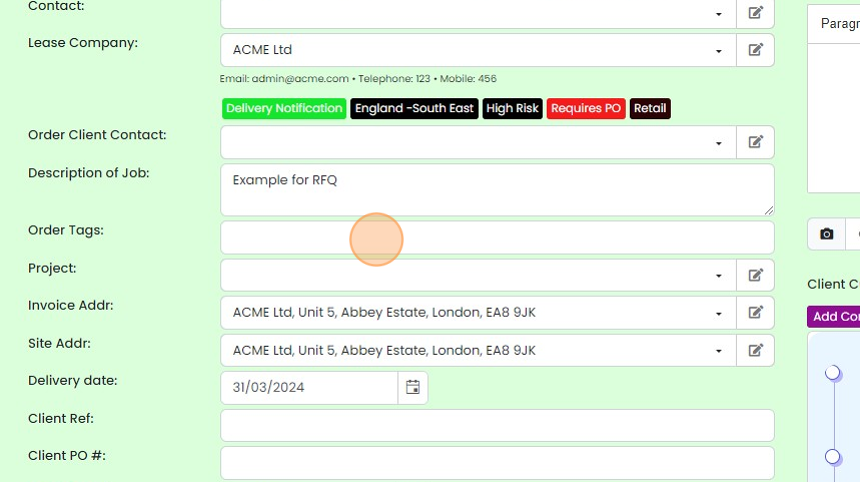
    Quote details form with the empty Order Tags field highlighted, below Description of Job, for adding or removing tags
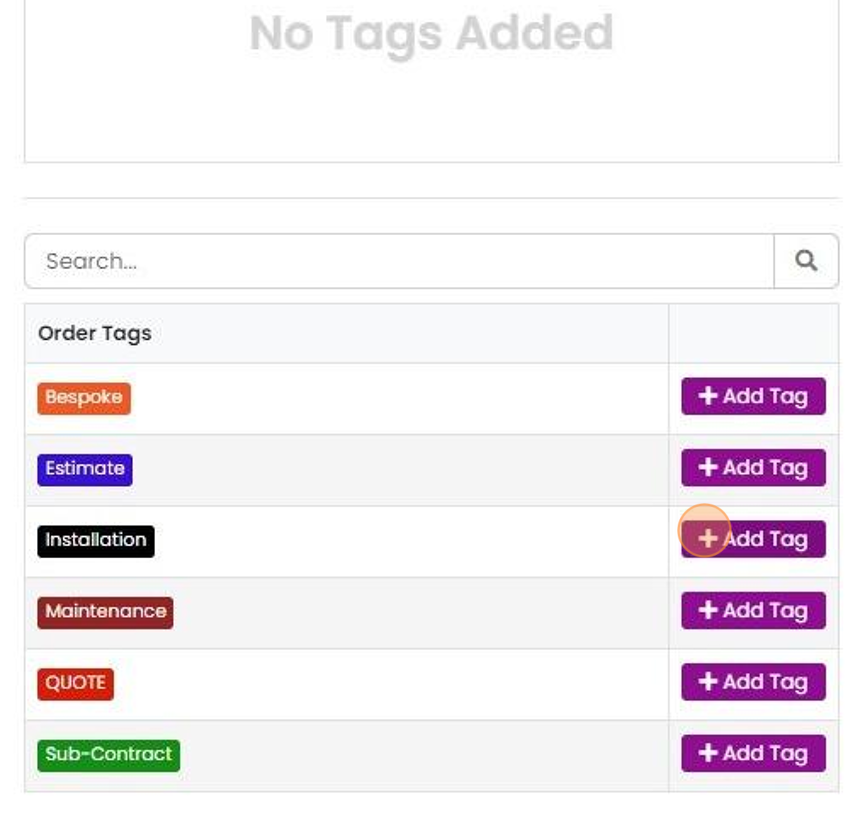
  5. Add a tag

    Order Tags list under an empty No Tags Added panel, with the Add Tag button highlighted next to the Installation tag
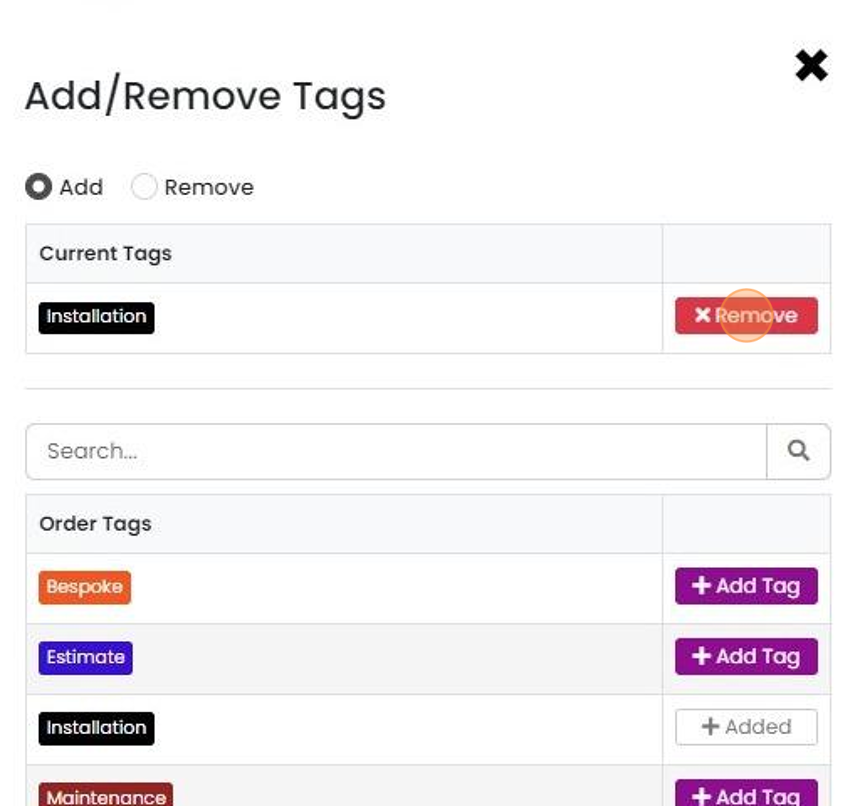
  6. Or click remove

    Add/Remove Tags dialog with the Remove button highlighted next to the Installation tag under Current Tags
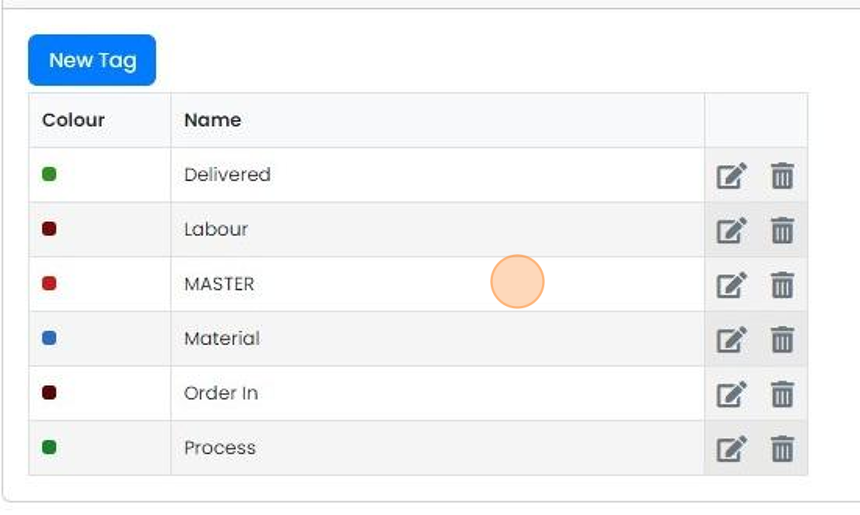
  7. Item Tags

    Item Tags list with New Tag button, showing Colour and Name columns plus edit and delete icons for tags like Delivered
  8. On a Quotation, Job/Sales Order, etc., click "Add"
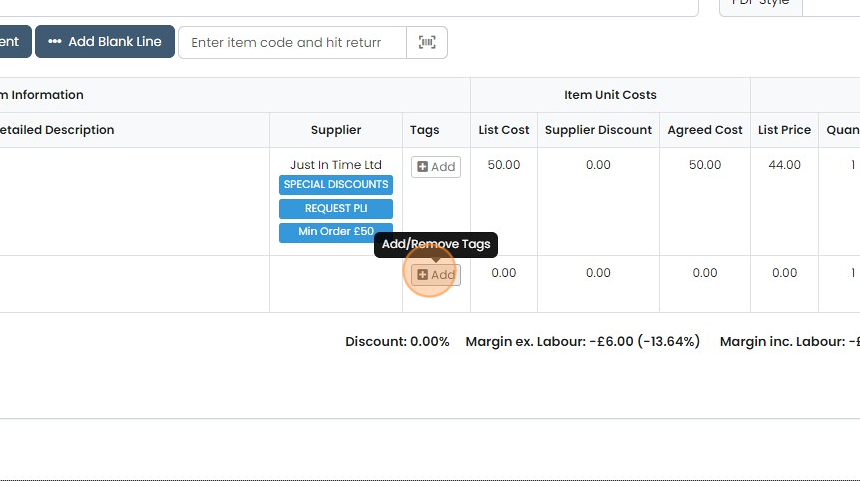
    Line items table with the Add button in the Tags column highlighted for the second line, showing the Add/Remove Tags tooltip
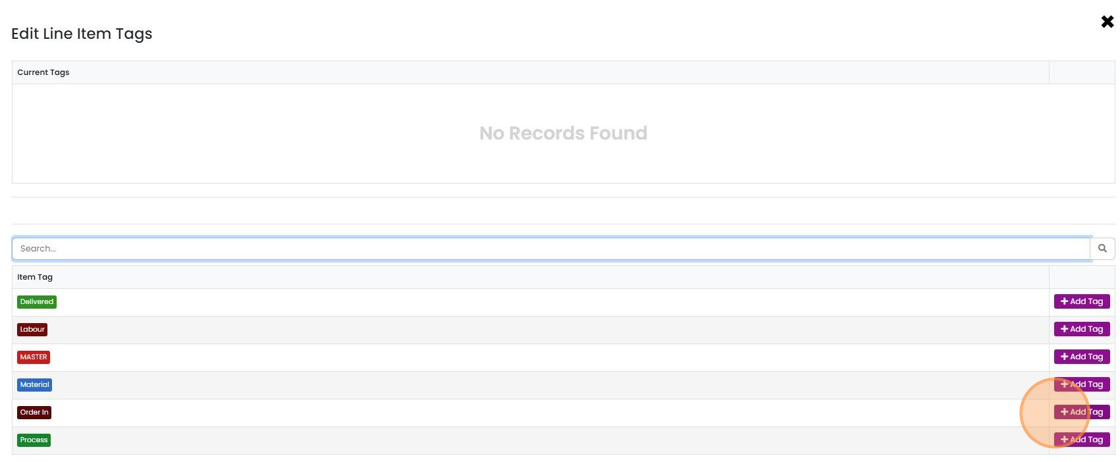
  9. Click "Add Tag"

    Add task tags

    Edit Line Item Tags window with no current tags, highlighting the Add Tag button next to the Order In item tag
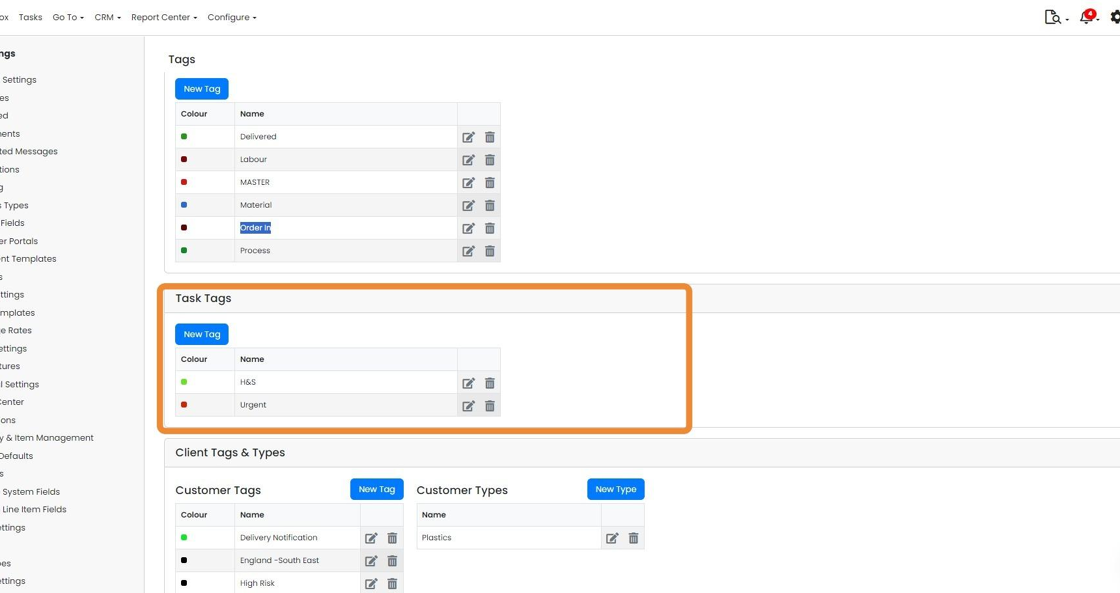
  10. Task Tags

    Tags settings page with the Task Tags section highlighted, showing a New Tag button and H&S and Urgent tags
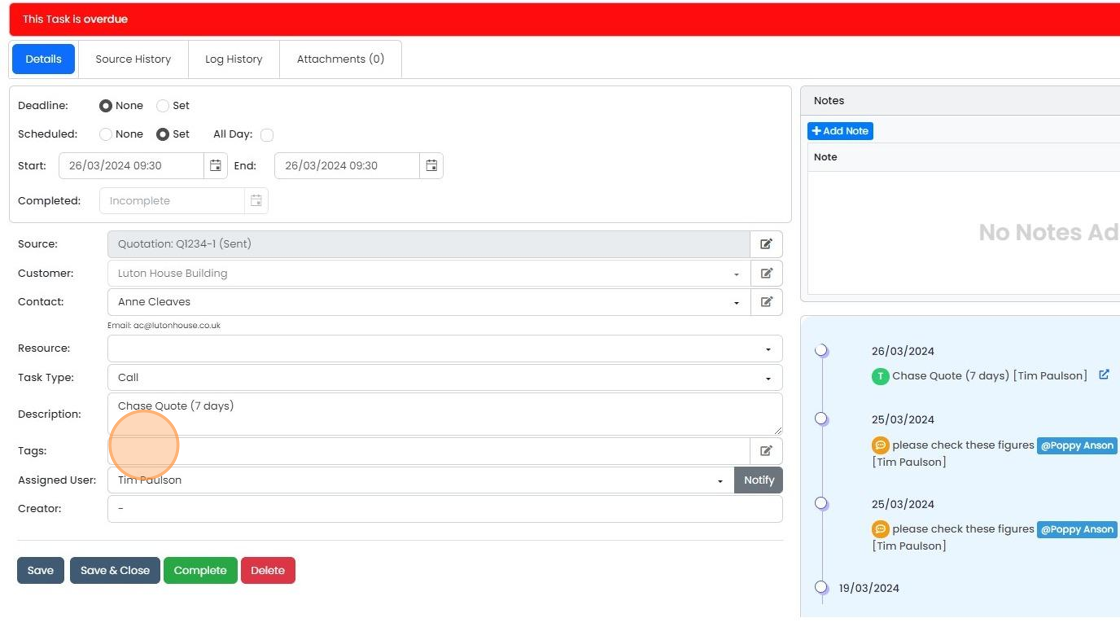
  11. On a task

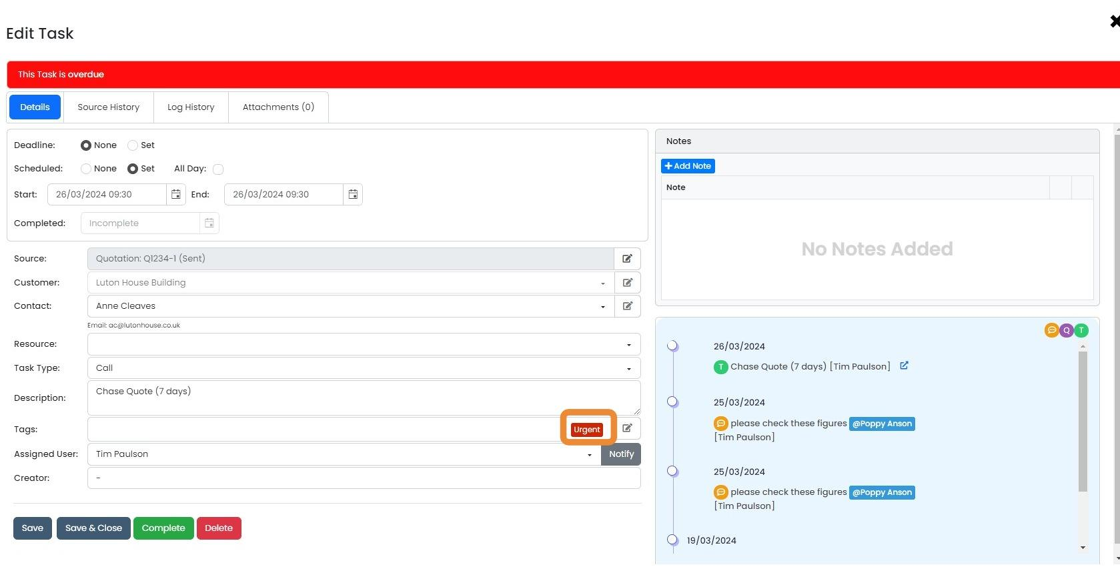
    Task Details tab with the Tags field highlighted below Description, ready to add tags to an overdue task
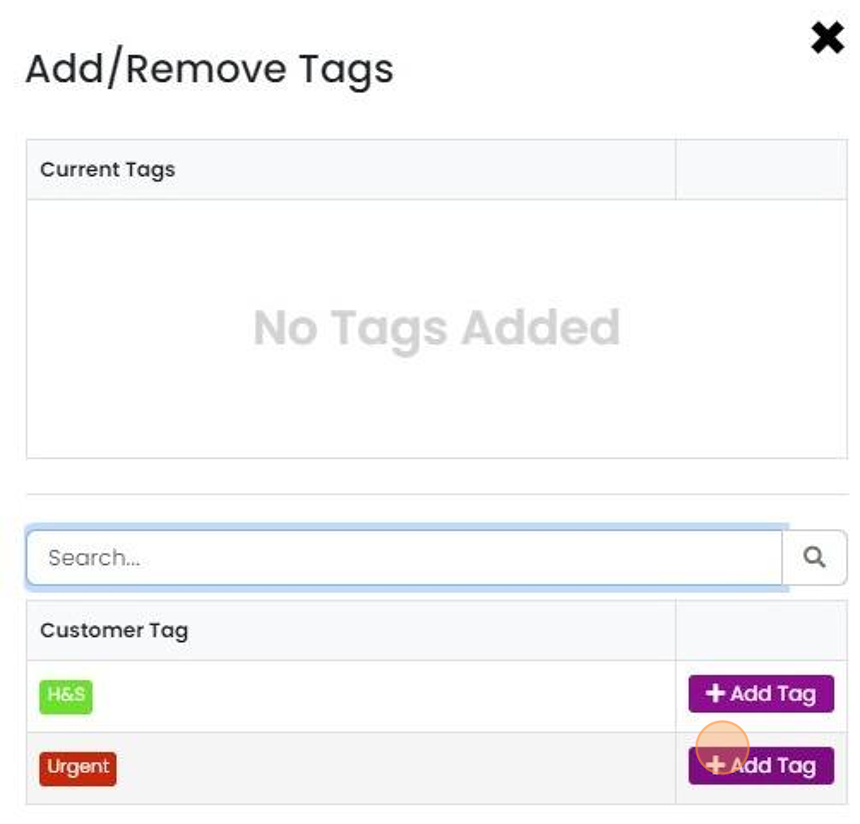
  12. Click "Add Tag"

    Add/Remove Tags dialog with no current tags, highlighting the Add Tag button next to the Urgent customer tag
  13. Click "×"

    Edit Task screen for an overdue task with the red Urgent tag highlighted in the Tags field, edit icon beside it
  14. And on the task list view

    Add customer and contact tags
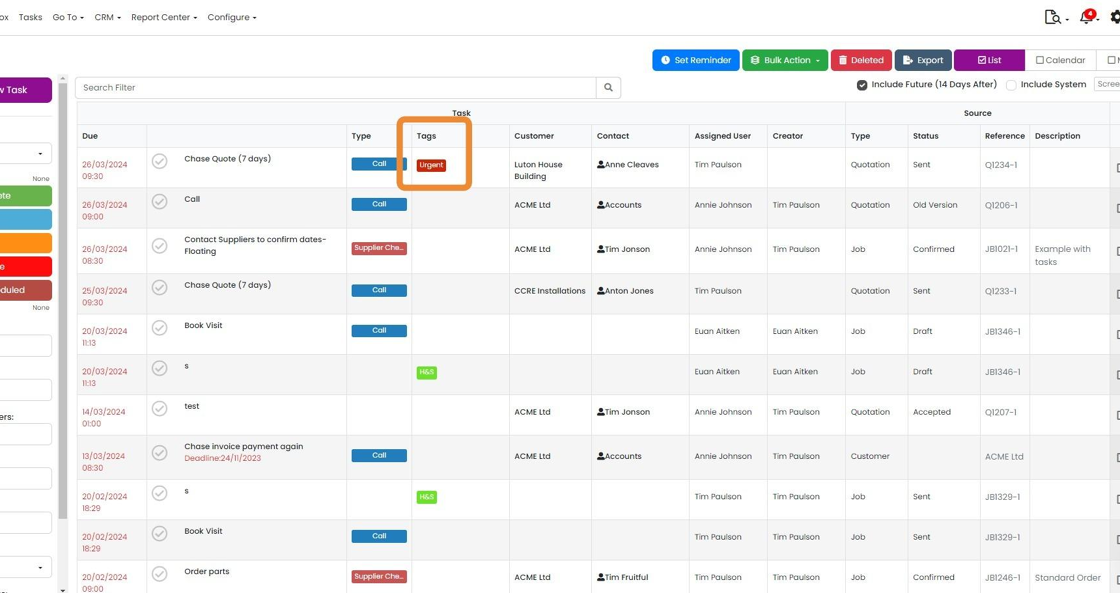
    Tasks list view with the Tags column highlighted, showing a red Urgent tag on the first task's row
  15. Customer/Company Tags

    Client Tags & Types panel with the Customer Tags list showing colors, names, and edit and delete icons beside a New Tag button
  16. Add/remove tags from customers here

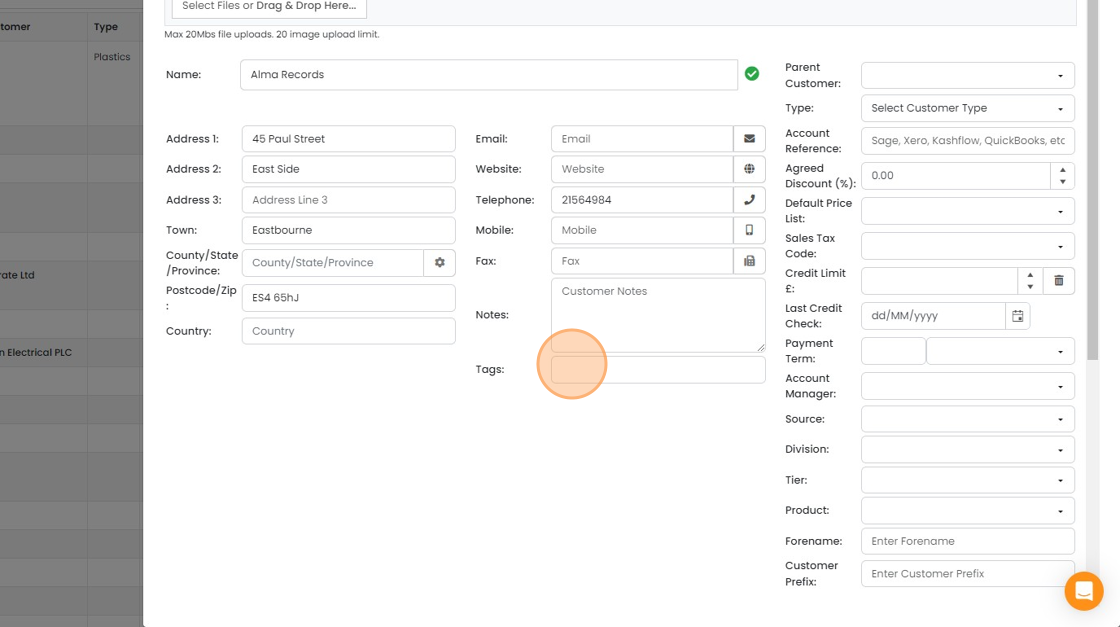
    Customer edit form with the Tags field highlighted below Notes, where tags can be added to or removed from a customer
  17. On Quotations, Jobs/Sales Orders, etc., these tags are always visible

    Quotation header with Customer field showing Remaining Credit and a red Requires PO tag displayed below the customer
  18. Customer/Company Contact Tags

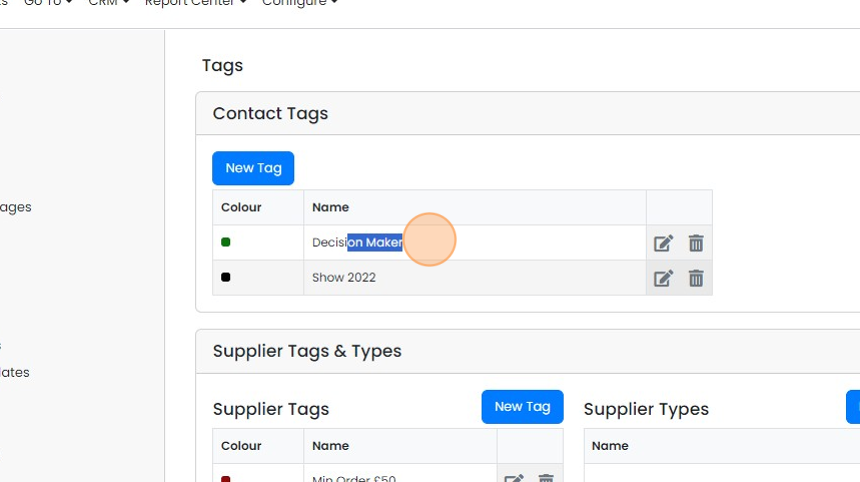
    Tags page with the Contact Tags table highlighted, showing the Decision Maker tag selected beneath the New Tag button
  19. Click this link

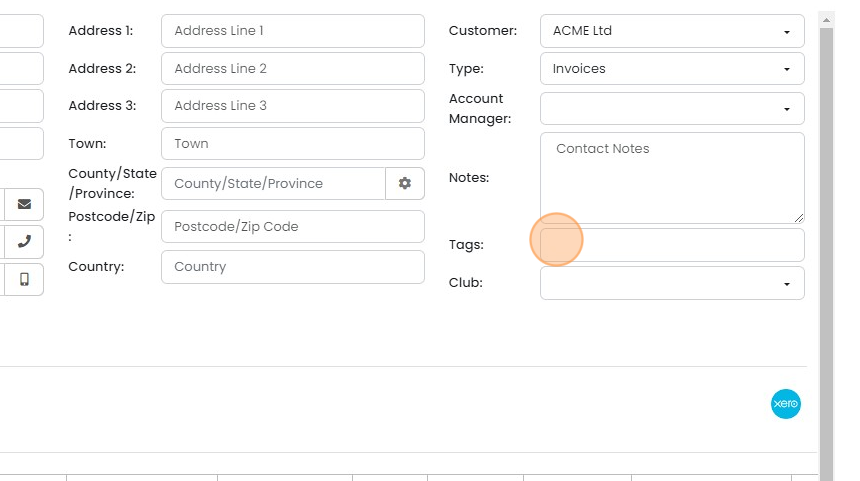
    Contact details form with address fields and the Tags field highlighted, below Notes in the right-hand column
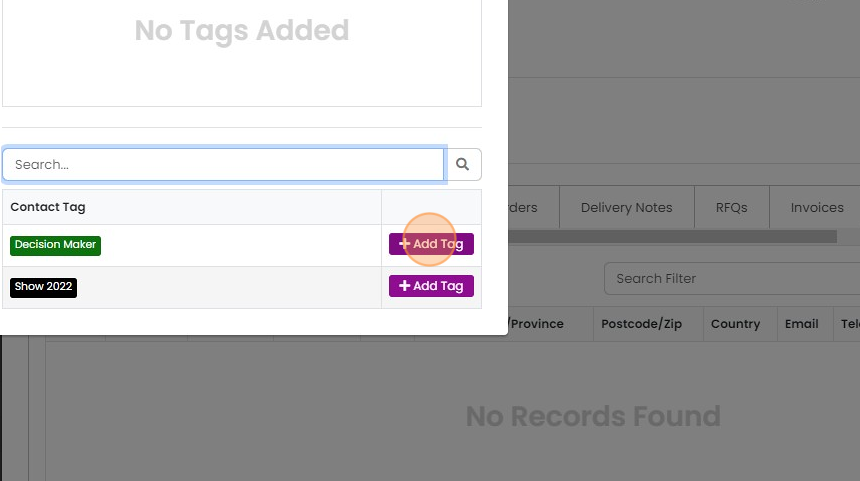
  20. Click "Add Tag"

    Contact Tag panel with the Add Tag button highlighted next to the Decision Maker tag, below a No Tags Added area
  21. Click "×"

    Contact edit form showing the Decision Maker tag in the Tags field, with the × close button highlighted at top right
  22. Click "Decision Maker"

    Add supplier tags
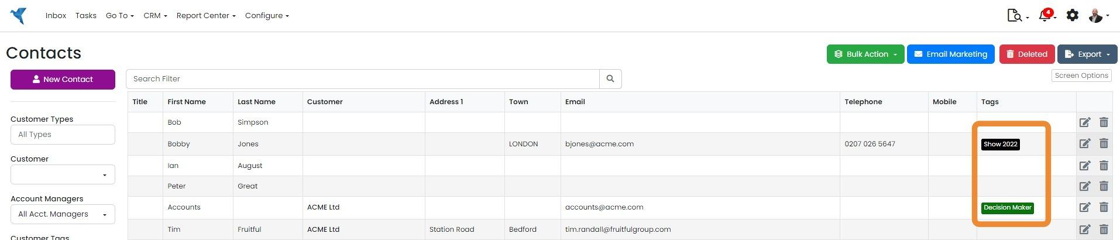
    Contacts list with the Tags column highlighted, showing Show 2022 and Decision Maker tags on contact rows
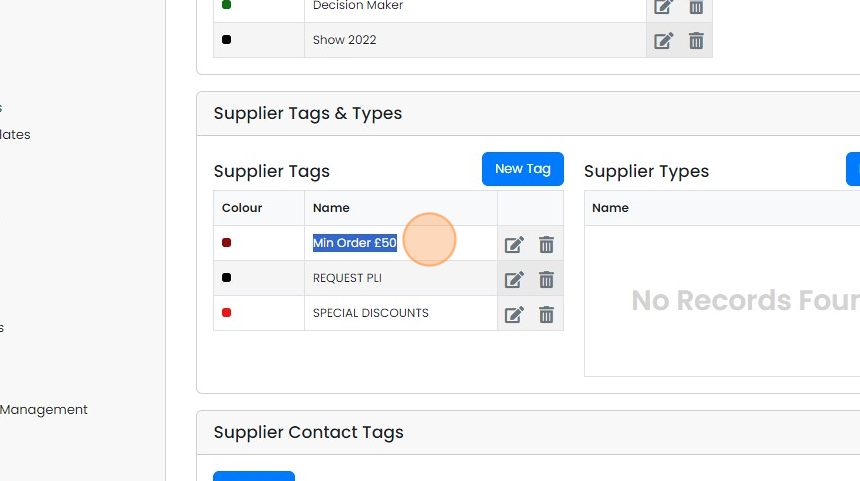
  23. Supplier Tags

    Supplier Tags & Types panel with the Min Order £50 tag highlighted in the Supplier Tags list, beside the New Tag button
  24. These appear on the Purchase Orders and RFQs

    Purchase Order header with a supplier selected, showing a red
  25. And on the item on Quotations, etc., where the Supplier column is showing

    Item row on a quotation showing the Supplier column with a blue
  26. Supplier Contact tags

    Assign user tags
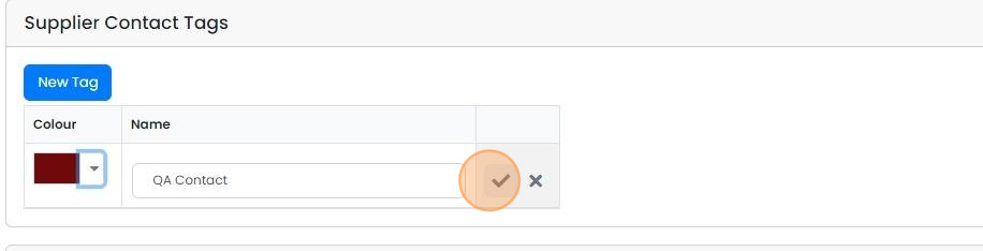
    Supplier Contact Tags panel with a new tag named QA Contact and a dark red colour, with the checkmark save button highlighted
  27. User tags

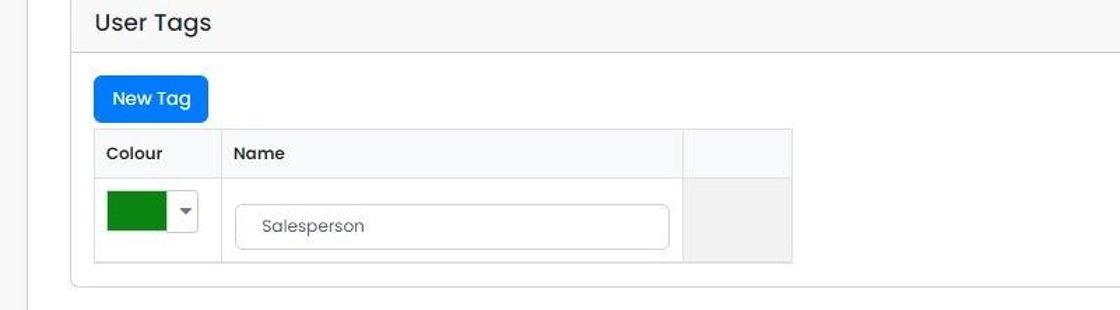
    User Tags panel with a New Tag button and a row with a green Colour picker and the Name field set to Salesperson
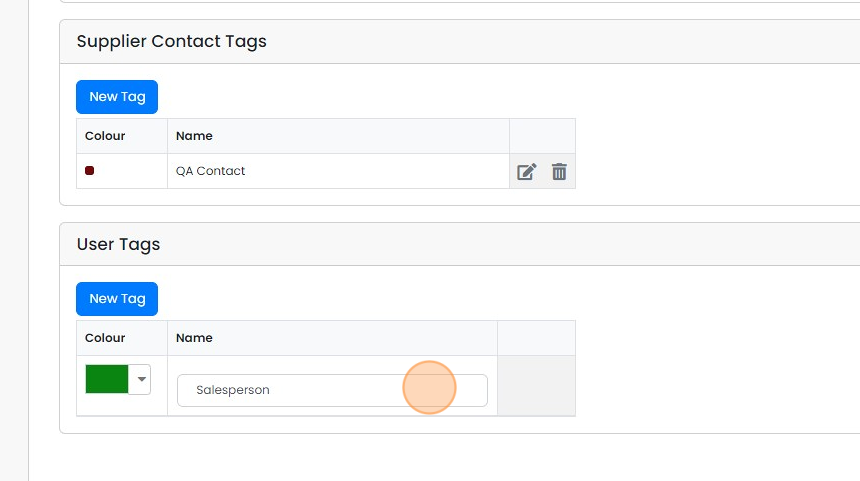
  28. Click this field

    User Tags section with a new tag row, highlighting the Name field containing Salesperson next to a green Colour picker
  29. To assign tags to user, click "Team Settings"

    Tags settings page with Supplier Contact and User Tags, and Team Settings highlighted in the left settings menu
  30. Edit a specific user

    Manage Team Members table in Team Settings with the edit (pencil) icon highlighted on the first team member's row
  31. Click on the tag field

    User details form with the Tags field highlighted below Role, Phone Number and Two Factor Authentication settings
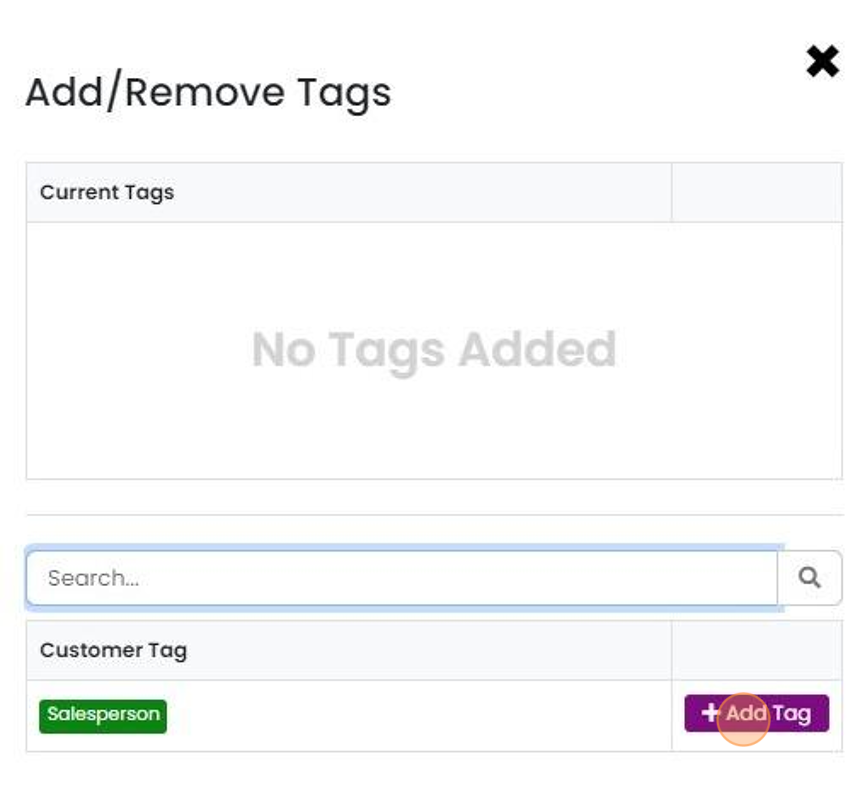
  32. Click "Add Tag"

    Add/Remove Tags window with no current tags, highlighting the Add Tag button beside the Salesperson customer tag

Tags are managed in the settings but apply in slightly different ways depending on which one they are.
​

Frequently asked questions

Was this helpful?

See Zigaflow on your own workflow

Book a demo and we will walk through quoting, jobs and purchasing the way your team runs them.

Or see how Zigaflow would fit your business, free